Why Metal 3D Printing Post-Processing Is the Real Bottleneck
11 min
- The Complexity of Finished Parts
- Common Metal 3D Printing Post-Processing Steps
- Why Automation Isn’t a Silver Bullet
- The Efficiency Gap in the Metal AM Supply Chain
- Resolving Supply Chain Bottlenecks in Metal AM
- Designing for the Finish: Engineer’s Toolkit
- Design Stage Optimization
- The Solution: The Integrated "One-Roof" Workflow
- Final Takeaways for Engineers
- FAQ about Metal 3D Printing Post-Processing
The Complexity of Finished Parts
In metal additive manufacturing, printing the part is actually the easy part.
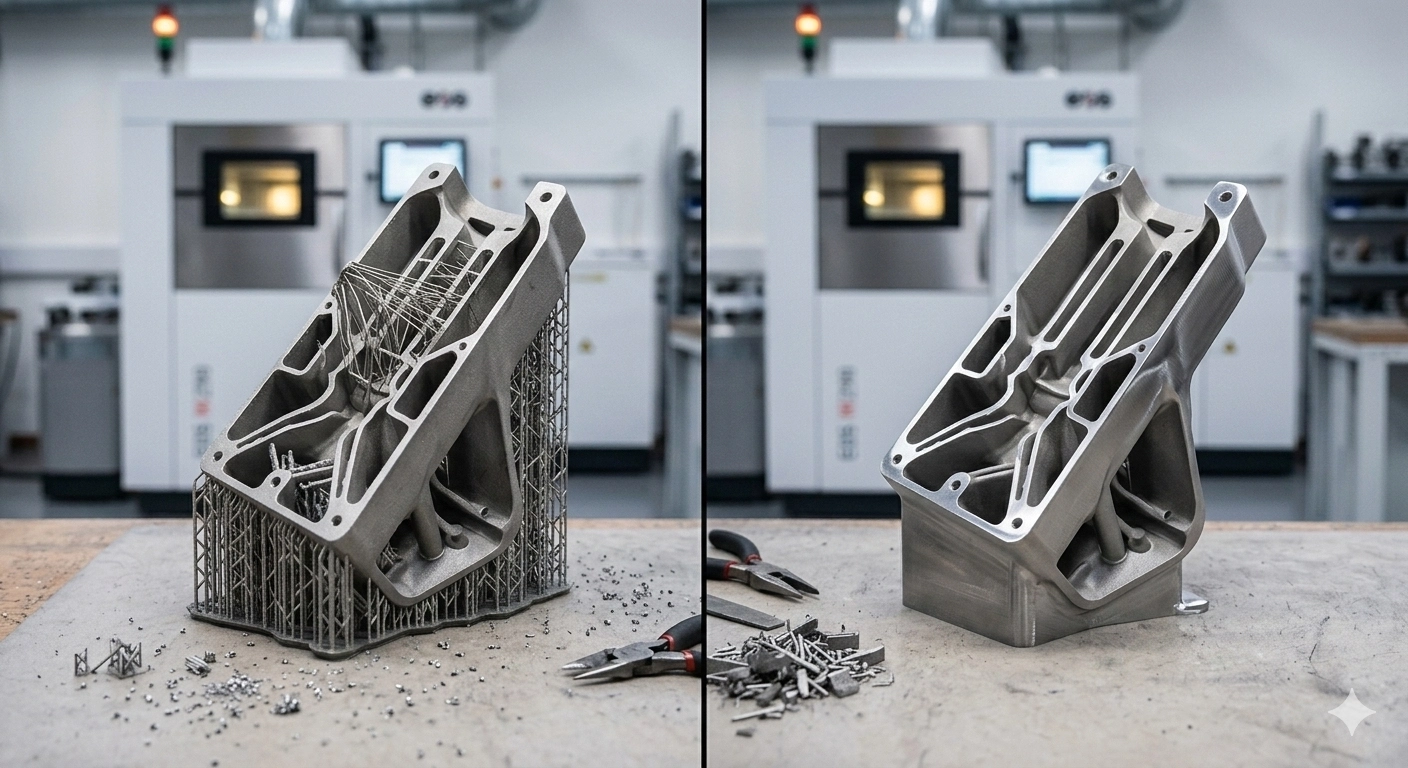
What comes off the machine usually isn’t ready to use yet. The surface can be rough, support structures are still attached, and the internal stresses from printing haven’t been relieved. Before that component can go anywhere near an assembly or a test bench, it needs several additional steps. This stage, metal 3D printing post processing, is where a lot of projects quietly slow down.
Most engineers run into this the first time they try to move a printed metal part into real testing. The printer might finish a build overnight, but the next steps can take much longer. Support removal in metal 3D printing, heat treatment, machining, and finishing all have to happen before the part behaves like a proper production component.
Surface quality is a big reason why. Processes like SLM surface finish improvement or binder jetting post processing are often necessary just to meet functional requirements. Complex parts with internal channels make finishing a total nightmare.
Common Metal 3D Printing Post-Processing Steps
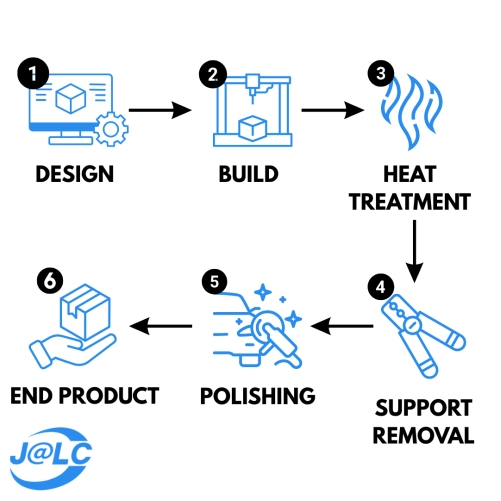
After the printing cycle, parts require several critical post-processing steps to meet structural and aesthetic requirements:
- Support Removal: Removing sacrificial structures used for overhangs and heat dissipation.
- Heat Treatment: Essential for stress relief (reducing internal tension) and improving mechanical properties like ductility and hardness.
- Machining & Polishing: CNC milling or abrasive polishing to achieve tight tolerances and a smooth surface finish (lowering $R_a$ values).
SLM vs. Binder Jetting: Post-Processing Comparison
The post-processing requirements for Selective Laser Melting (SLM) and Binder Jetting (BJ) differ significantly due to their fundamental bonding mechanisms (thermal fusion vs. chemical binding).
Feature | SLM (Selective Laser Melting) | Binder Jetting (BJ) |
|---|---|---|
Primary Goal | Stress relief and surface refinement. | Densification and metallurgical bonding. |
Initial State | Fully dense metal attached to a plate. | Fragile "Green Part" buried in powder. |
Depowdering | Minimal; mostly external or simple cavities. | Extensive; critical for internal channels. |
Support Removal | Difficult; usually requires wire EDM or pliers or precision cutting/grinding. | Easy; supports are often non-structural. |
Thermal Process | Stress Relief / HIP: Prevents warping. | Sintering: Essential for 95-99% density. |
Shrinkage Control | Low; high dimensional accuracy (±0.1mm). | High (15-20%); requires scale compensation. |
Surface Finish | Ra = surface roughness | Ra = surface roughness |
Common Finishing | CNC Machining, Grinding, Polishing. | Infiltration (optional), Tumble Polishing. |
Learn about more details, read this guide to understand the differences between SLM vs binder jetting.
While these process differences matter, the real bottleneck for many engineers isn’t the printing itself—it’s the Metal AM supply chain. Parts often move between multiple shops for heat treatment, machining, and finishing, adding days of transport and coordination. Each handoff increases risk, and a single delay can stall the entire project, making post-processing the true rate-limiting step.
Modern integrated workflows address this issue. Platforms like JLC3DP combine printing, heat treatment, support removal, and finishing under one roof. Engineers can upload CAD files, run automated design checks, and plan production with all necessary post-processing steps included from the start. This approach shortens lead times, reduces manual intervention, and ensures consistent part quality—turning metal 3D printing post processing from a bottleneck into a streamlined workflow.

Why Automation Isn’t a Silver Bullet
Automation is often discussed in additive manufacturing. Faster printers, automated depowdering systems, and robotic polishing are often seen as the path to fully digital production. And in some areas, automation really does help. But when it comes to metal 3D printing post-processing, things are still more complicated than that.
The Complexity Challenge
One of the biggest obstacles to full post-processing automation is geometry.
No two metal AM parts are exactly the same. The support structures depend on build orientation, wall thickness, overhangs, and internal channels. That means the cleanup work changes from part to part as well.
Take support removal in metal 3D printing as an example. On a simple part, supports might snap off or be removed quickly with basic tools. On complex parts, especially those with thin walls or internal features, support removal often requires careful manual work. Operators may need to cut supports away one by one, grind small areas, or machine certain surfaces afterward to bring them back within tolerance.
Even metal polishing can become tricky. A flat external surface is easy to automate, but lattice structures, curved channels, and internal cavities are not. Those are the features that give additive manufacturing its advantages, still they also make automated finishing far more difficult.
Automation is valuable, but it has limitations. It loves predictable parts. The second a design gets intricate, you still need a human in the loop to keep things from going south.
Automation Limitations
Even the most advanced automation equipment can only handle predictable and regular geometries. Parts with internal channels, thin walls, or lattice structures often cannot be fully processed by robotic polishing or automated finishing. Manual intervention remains essential: technicians can determine the order of support removal, adjust tool pressure, or switch to delicate methods in fragile areas to prevent part damage.
The High-Touch Requirement
Take aerospace or medical gear. When you're dealing with parts that can't fail, quality control is everything. We're talking about surface finish and dimensional accuracy that has to be spot-on. Because the stakes are so high, the final finishing steps usually fall to an experienced technician. You need someone who can look at the part and pivot if the process isn't hitting the mark.
A good example: a tech is pulling supports and notices a thin wall that’s way too flimsy for a heavy industrial grinder. An automated system would just plow right through it and ruin the geometry. A person sees that, stops, and switches to a manual approach to save the part.
This kind of judgment is hard to automate. Machines can follow programmed steps, but they don’t always recognize subtle issues that appear during finishing.
So even as automation improves, metal 3D printing finishing often stays partly manual when the part is critical.
The Efficiency Gap in the Metal AM Supply Chain
There’s another issue that doesn’t get discussed enough: the metal AM supply chain around metal 3D printing post processing.
In many workflows, printing happens in one place, heat treatment happens somewhere else, and surface finishing happens at a third facility. On paper, each step may only take a few hours. In reality, parts spend most of their time waiting, waiting for transport, waiting for the next shop to schedule the job, or waiting for inspection.
A lot of engineers have seen this firsthand. A metal part might finish printing in a day, but by the time it goes through support removal, stress relief, finishing, and inspection, the total lead time stretches into weeks.
Resolving Supply Chain Bottlenecks in Metal AM
Metal additive manufacturing started as a niche capability. Early workflows often relied on multiple vendors for printing, heat treatment, machining, and finishing.
While this approach worked for prototypes, it created major delays when production volumes increased. Parts might finish printing in hours but then wait days or weeks for support removal, heat treatment, and surface finishing.
Every additional supplier introduces new logistics: shipping, scheduling, and quality coordination. These handoffs are often the real bottleneck in metal 3D printing post-processing, not the printing process itself.
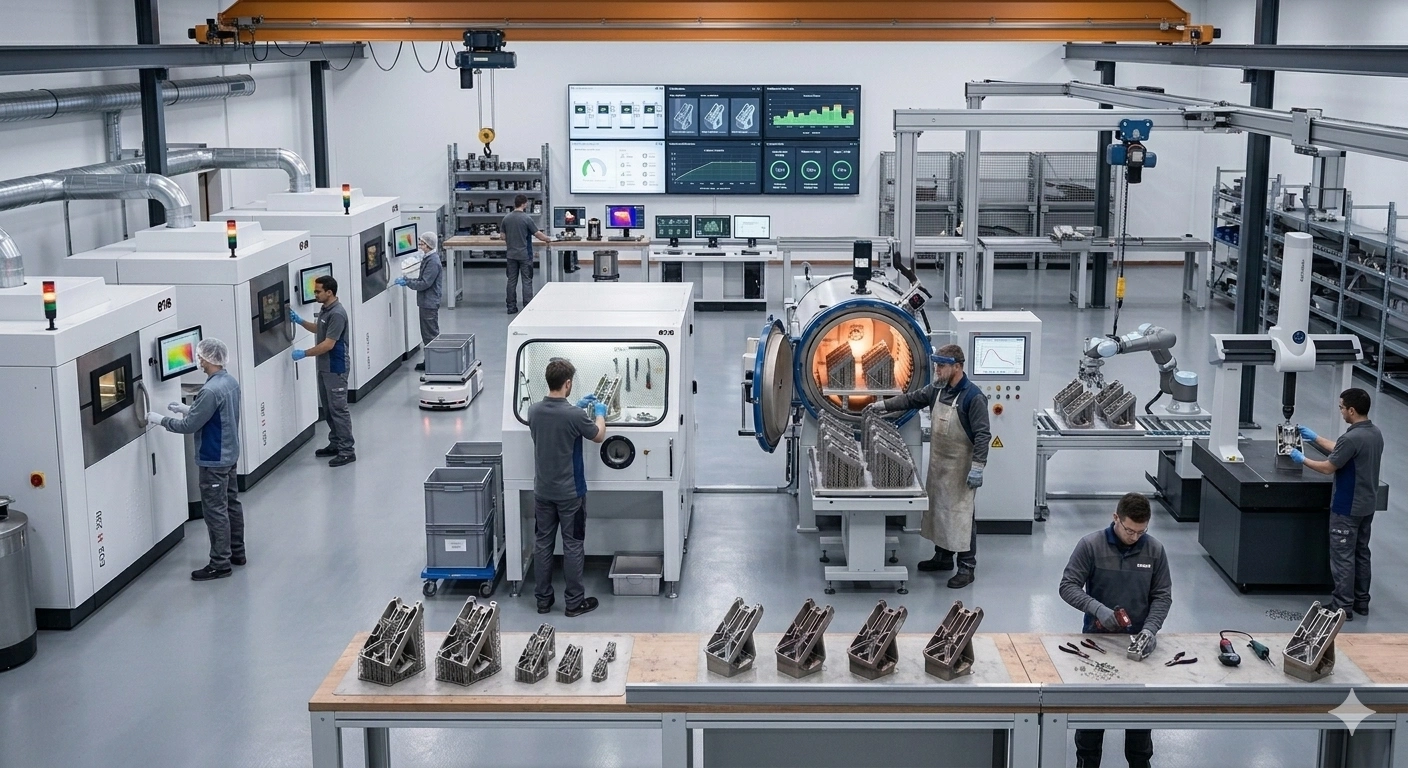
To address this issue, many modern manufacturing platforms are shifting toward integrated workflows where printing and post-processing happen within the same facility.
When support removal, additive manufacturing heat treatment, CNC machining, and surface finishing are handled under one roof, parts move through the metal AM workflow much faster.
For engineers, the benefit is practical:
- shorter turnaround times
- fewer supply chain delays
- more predictable production schedules
Platforms like JLC3DP follow this integrated production model. Engineers can upload CAD files, run automated design checks, and receive a production plan that includes all required post-processing steps from the beginning.
This reduces supply chain friction and helps metal AM move closer to true production manufacturing rather than isolated prototyping
Designing for the Finish: Engineer’s Toolkit
Metal 3D printing post-processing begins during the design stage. Geometry, support placement, and surface requirements all influence finishing difficulty, lead time, and production cost.
Engineers who plan for post-processing early can significantly reduce manual finishing work.
Support Placement Strategies
Support structures are essential in SLM metal printing, but poor placement can create difficult finishing work.
Whenever possible, supports should be located in accessible and non-critical areas. Avoid placing supports on thin walls or functional surfaces, as removal may require grinding or machining that affects accuracy.
Good support planning helps reduce manual cleanup and lowers the risk of damaging delicate features.
Surface Requirements
Not every surface needs the same finishing level.
Functional surfaces such as sealing areas, contact interfaces, or fluid channels often require machining or polishing to meet performance requirements.
Non-critical surfaces or internal structures can usually remain as-printed, which helps reduce finishing time and cost.
Complex Feature Planning
Metal AM enables advanced geometries such as internal channels, lattice structures, and overhangs, but these features can complicate post-processing.
Engineers should consider whether these areas will remain accessible for support removal, depowdering, or finishing operations.
Planning geometry with post-processing access in mind can significantly improve manufacturing efficiency.
Integrated Engineering Support
Some manufacturing platforms provide design support to help optimize parts for both printing and finishing.
At JLC3DP, engineers evaluate build orientation, support strategies, and finishing requirements for processes like SLM and HP Binder Jetting.
This integrated approach helps parts move faster from CAD design to finished metal components.
Design Stage Optimization
The success of metal 3D printing heavily depends on design. Strategic support placement and surface requirement planning can reduce post-processing time:
- Supports in accessible areas prevent damage during removal
- Functional surfaces (sealing/fluid channels) get finer finishing, internal structures can remain as-printed If it does not affect functionality or mechanical properties.
JLC3DP engineers help optimize designs for SLM or BJ, ensuring both printability and post-processing efficiency.
The Solution: The Integrated "One-Roof" Workflow
The real bottleneck isn't the technology—it's the logistics. Shipping parts between a print shop, a heat-treat facility, and a CNC machine shop adds weeks of lead time and multiple points of failure.
Vertical Integration at JLC3DP resolves this by consolidating the entire lifecycle:
- Unified Production: Parts move from the printer to the furnace and CNC station in hours, not days.
- Design-to-Finish Feedback: If a specific geometry causes support removal issues, our engineers adjust the build orientation for the next batch immediately.
- Cost Transparency: One quote covers the entire process, eliminating hidden fees from third-party finishers.
Final Takeaways for Engineers
Design for the Finish: Optimize support placement during CAD to minimize manual grinding.
Material Matters: High-performance alloys like Titanium or Copper require specialized heat treatment cycles to achieve desired mechanical properties—plan for these early.
Consolidate Your Supply Chain: Choosing a partner with on-site post-processing is the most effective way to cut lead times by up to 50%.
FAQ about Metal 3D Printing Post-Processing
Q1: What is metal 3D printing post processing?
A: Post-processing includes support removal, heat treatment, surface finishing, and machining steps required to make printed parts functional.
Q2: Why is post-processing often a bottleneck?
A: Complex geometry and manual finishing steps can extend timelines even after printing is complete.
Q3: Can metal 3D printing post processing be automated?
A: Automation improves efficiency, but human oversight is still needed for geometry-specific tasks and quality control.
Q4: How does integrated processing improve lead times?
A: Coordinated workflows reduce handoffs and delays, allowing parts to move from printing to finished hardware faster.
Q5: Is post-processing required for all metal AM parts?
A: Most metal parts require some level of finishing to meet dimensional and surface quality requirements.
Keep Learning
Is 3D Printing Food Safe? Best Materials & Coating Guide
In recent years, food safe 3d prints have captured significant attention. People are concerned about some questions, such as: Are 3d prints food safe? Are there any food safe 3d printing materials? How to make 3D Prints food-safe?…… The following guide answers these questions. Read on for an introduction to food safety, food safety 3D printing materials choices, and a variety of methods to make 3d prints food safe. Quick Answer — Are 3D Prints Food Safe? Most 3D-printed parts are not food-safe by defa......
3D Printer Safety: 3D Printers are Worse than You Thought
3D printers are incredible tools for innovation and creativity, but they do come with safety risks that are often overlooked. While they are generally safe when used correctly, there are several potential hazards that users should be aware of. Here’s a breakdown of why 3D printer safety might be worse than you thought: 1. Toxic Fumes and Airborne Particles ● Heated Plastics: When thermoplastics likeABS (Acrylonitrile Butadiene Styrene) or PLA (Polylactic Acid) are melted, they can release ultrafine pa......
Why Metal 3D Printing Post-Processing Is the Real Bottleneck
The Complexity of Finished Parts In metal additive manufacturing, printing the part is actually the easy part. What comes off the machine usually isn’t ready to use yet. The surface can be rough, support structures are still attached, and the internal stresses from printing haven’t been relieved. Before that component can go anywhere near an assembly or a test bench, it needs several additional steps. This stage, metal 3D printing post processing, is where a lot of projects quietly slow down. Most eng......
3D Printer Enclosure: Why Do You Need One?
3D printer enclosure can provide a stable printing environment for your printer and improve your printing results. This article will introduce the advantages of 3D printer enclosure and how to build a 3D printer enclosure. 3D Printer Enclosure Advantages Maintain a Stable Printing Environment The enclosure helps maintain the temperature required for the printing process and reduces temperature fluctuations, thereby reducing warping problems caused by uneven shrinkage, especially when printing material......
10 Things You Should Never 3D Print
(source: Freepik) 3D printing opens the door to creativity, customization, and convenience, but not everything should be on the print bed. While the tech keeps getting better, safer, and more accessible, there are still clear boundaries, legal, ethical, and material-based, that shouldn’t be crossed. Whether you're just starting out or you're knee-deep in STL files, it’s important to know where the line is between a clever print and a costly mistake. Here are 10 things you should never 3D print, and ex......
3D Printer Fire Safety: Risks and How to Protect Your Prints
Till this day, users on Reddit share how their 3D printer caught fire when left unattended. Luckily, some showed up in time. But not everyone is that lucky. In fact, according to fire safety reports, 3D printers are responsible for dozens of documented home fires every year. Even if the chances are 1 in 1,000. That raises the question: how real is the risk of a 3D printer fire, and how much is myth? In this blog, we’ll cut through the noise with: a. 3D printer fire myths vs reality b. Clear fire preve......