Lithophane 3D Print: How to Print Photos That Glow
15 min
- What Is a Lithophane?
- How Lithophane 3D Printing Works
- How to 3D Print a Lithophane in 5 Steps
- Best Lithophane Generators
- Best Lithophane Print Settings
- Choosing the Right Photo
- Lithophane Materials Compared
- Shapes, Frames & Backlighting
- Common Lithophane Problems
- When Should You Use a 3D Printing Service?
- FAQ about Lithophane 3D Print
- From Photo to Glow
Key Takeaways
- A lithophane 3D print turns a photo into a backlit relief plate: thin areas pass light and read bright, thick areas block it and read dark. The image only appears when you put a light behind it.
- Most converters follow one basic principle: image brightness becomes physical thickness. Photos typically convert as a negative, white-background logos as a positive — but the preview is the real check. Pick wrong and the print shows an eerie inverted ghost.
- Four settings carry most of the quality: layer height 0.06–0.12mm, 100% infill, and orientation chief among them. Everything else stays near the default.
- White or natural PLA is the working default for 3D printing lithophanes; translucent resin on an SLA machine resolves detail an order of magnitude finer than FDM.
- Most first-print failures are exposure problems, not printer problems: too dark means too thick — lower the maximum thickness before you touch anything else.
You can turn any photo into a glowing physical object, and the process takes about twenty minutes of actual work. A lithophane 3D print looks like nothing on the shelf (a flat, slightly wavy slab of white plastic) until a light goes behind it and the photograph appears, often with detail sharper than the screen it came from. A lithophane generator makes this happen by converting a photo into a 3D relief, mapping image brightness to physical thickness. This guide covers how the conversion works, the five steps from photo to printed plate, the settings that actually matter, and the photo and material choices that separate a crisp portrait from a gray smear.
What Is a Lithophane?
A lithophane is a relief plate whose thickness encodes the brightness of an image: where the picture is dark, the plate is thick; where it is light, the plate is thin. Held up to a lamp, the thick zones block light and read as shadow while the thin zones glow, and the photograph appears. The concept dates to 1820s France, where the plates were carved in wax and cast in porcelain; FDM (fused deposition modeling) printers just replaced the carving with a slicer.
The numbers that define a typical plate: total thickness around 2–3mm, with the thinnest areas near 0.4mm so light still passes and the plate still holds together. Those two dimensions, minimum and maximum, are the entire exposure system. Everything else on the converter screen is furniture.
If you have not worked with the format before, our guide to what an STL file actually is covers the file itself; this page is about turning a picture into one and printing it well.
How Lithophane 3D Printing Works
The conversion is one operation, repeated millions of times: the generator reads each pixel's brightness, maps it to a height between the minimum and maximum thickness, and builds a solid mesh from the result. Dark pixel, thick plastic. Bright pixel, thin plastic. No intelligence, no interpretation. That is why a soft, muddy photo produces a soft, muddy plate, and why no slicer setting can rescue a bad source image.
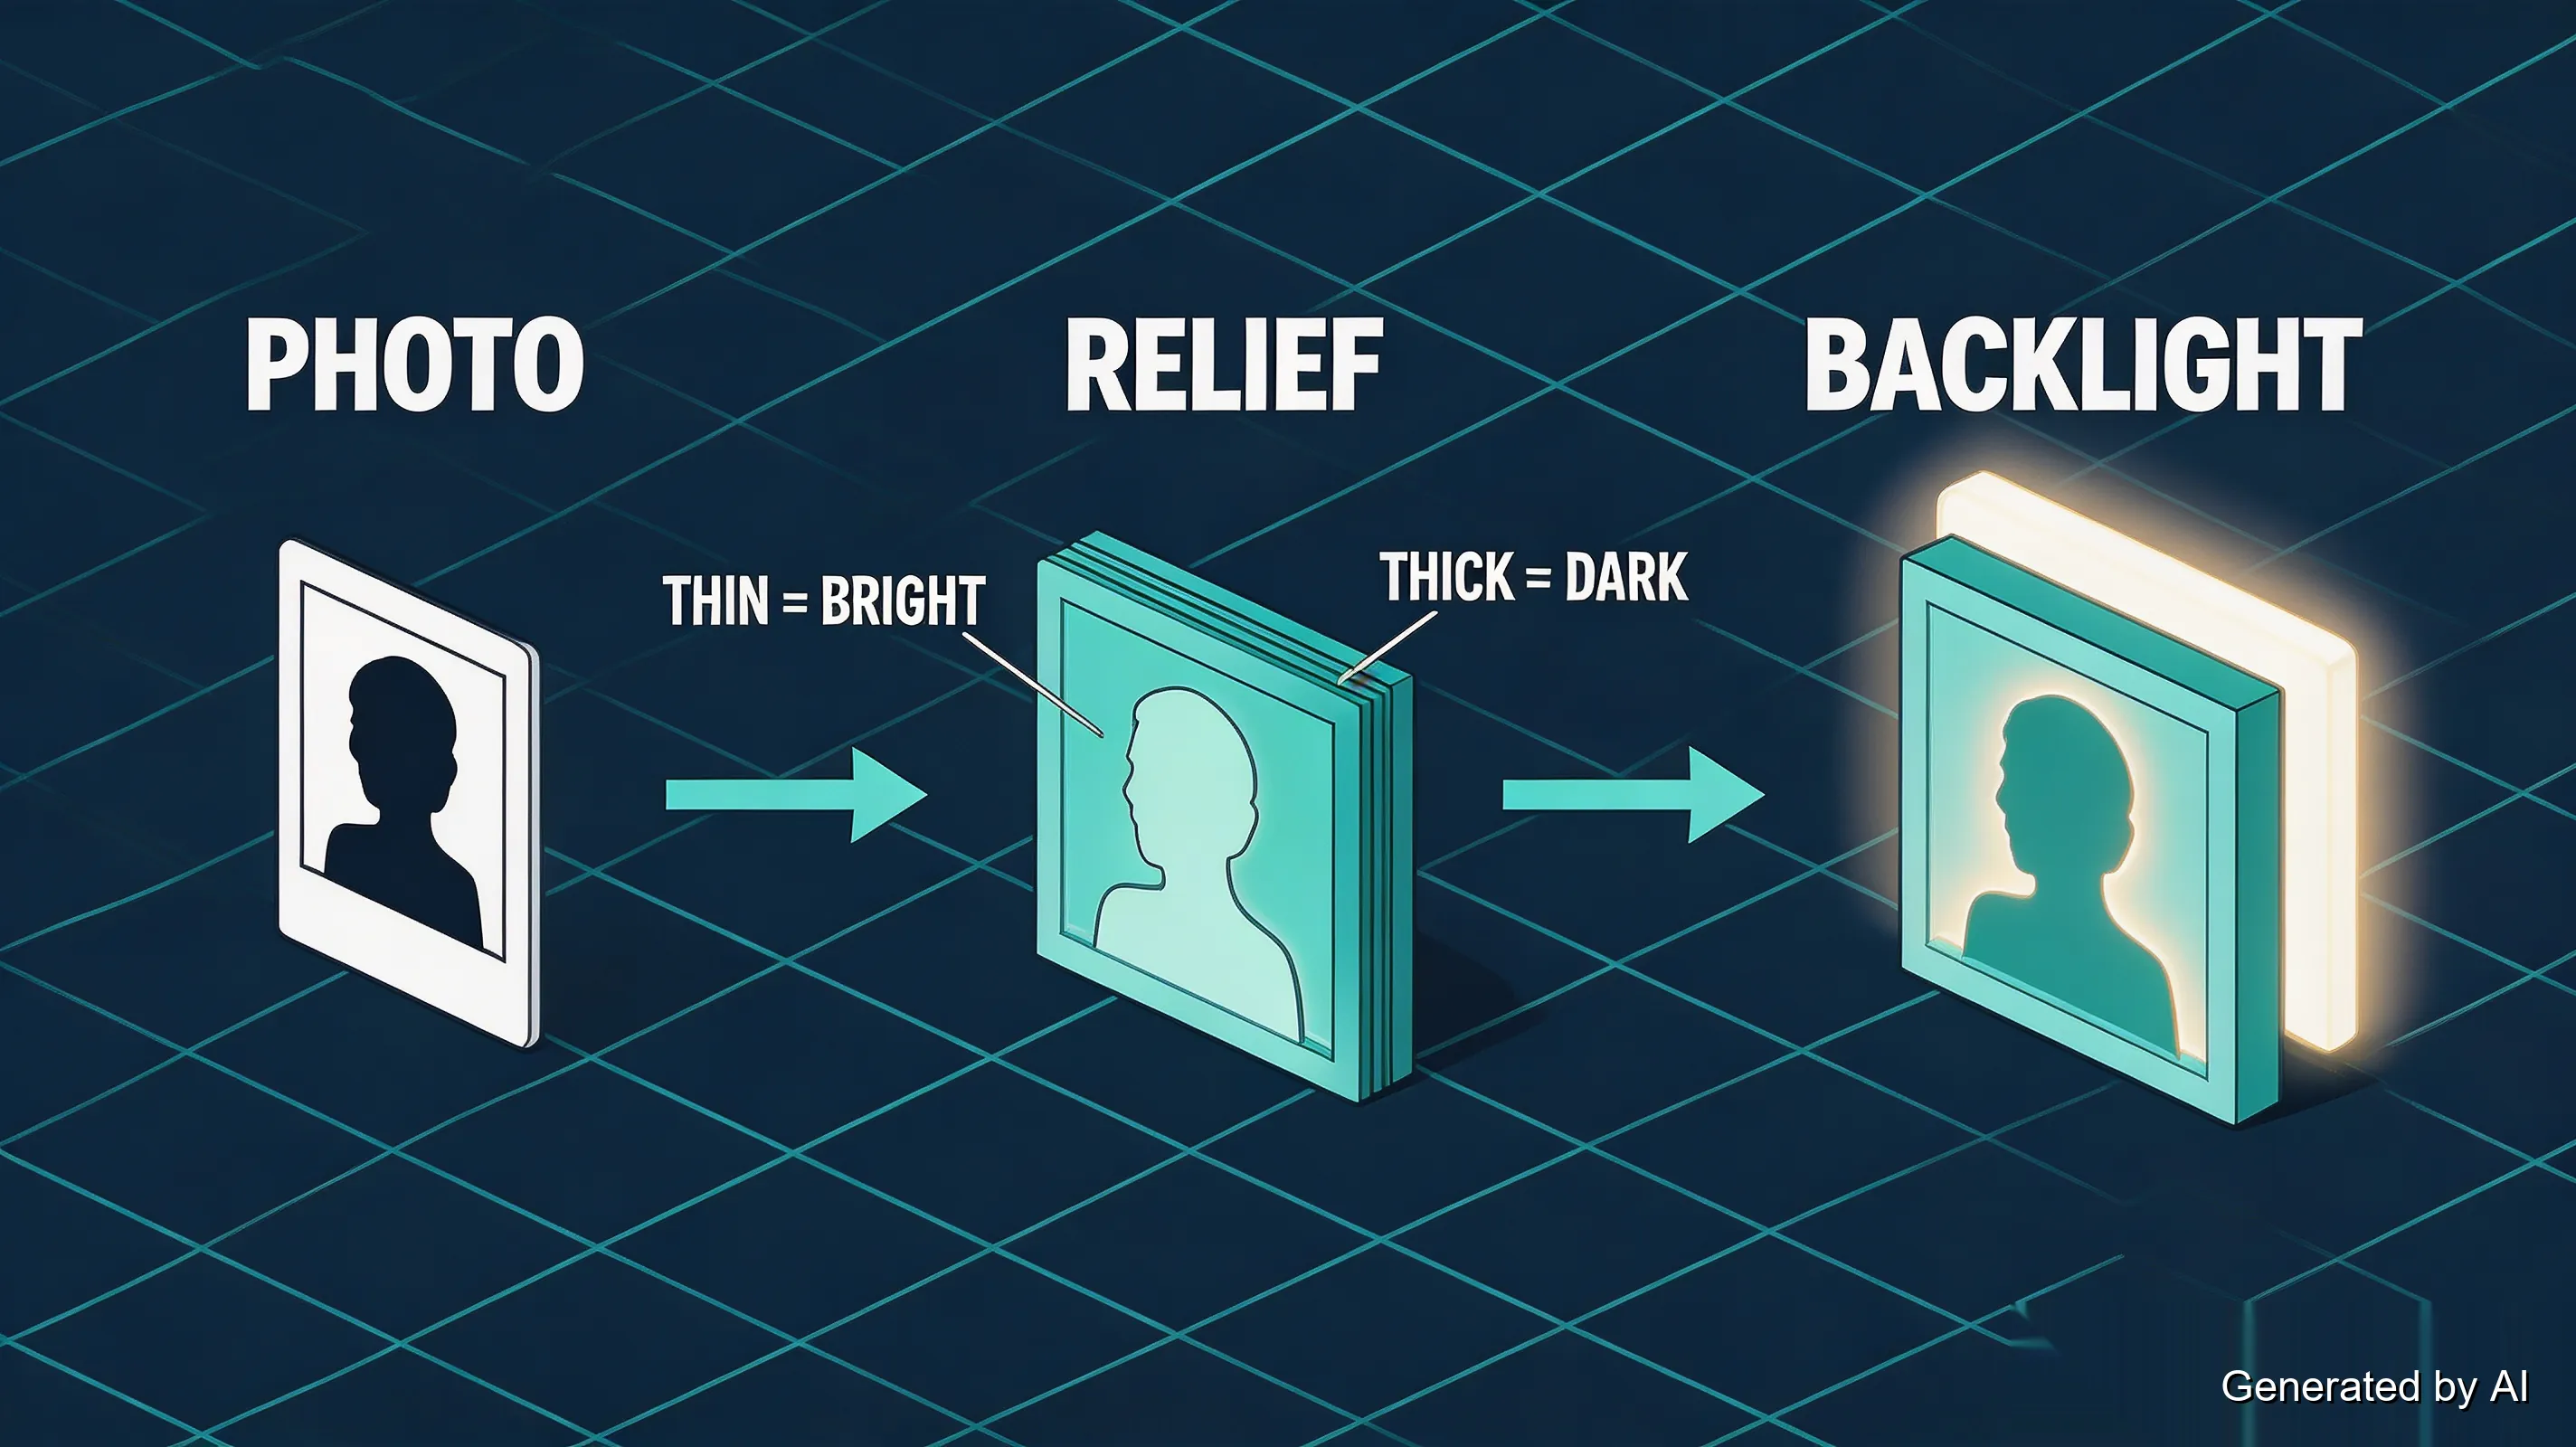
One decision trips up almost every beginner: whether the conversion should invert your image. For a typical photo (dark subject on a lighter background), most generators expect the inverted, or negative, mode, because dark areas need to become thick; a line drawing on plain white usually converts as-is. But the labels are not standardized (some tools call the photo setting "negative", others "invert"), and logos do not always follow the rule either. The reliable check is the preview, not the label: dark areas of the photo should produce thicker regions of the plate. If the preview looks inverted, flip the invert/negative option and check again.
3D printing lithophanes also inverts your normal instinct about quality: a smooth, glossy, even surface is not the goal. The surface *is* the image: every layer line is a potential horizon across someone's face. That is why the settings below trade speed for uniformity.
How to 3D Print a Lithophane in 5 Steps
- Choose the photo. High contrast, even lighting, subject separated from the background. There is more to it (size, resolution, what makes portraits work and landscapes fail), so this step gets its own section below.
- Generate the STL. Browser tools like ItsLitho, 3DP Rocks, and LithophaneMaker convert a photo to lithophane in a minute — the comparison below helps you pick. If you prefer staying in the slicer, Cura imports images directly (drag the file in), or you can add its marketplace lithophane plugin. Upload, set width and thickness, confirm the polarity, export.
- Slice with lithophane settings. Load the STL and change the settings that matter (next section). Leave the rest alone until your second print.
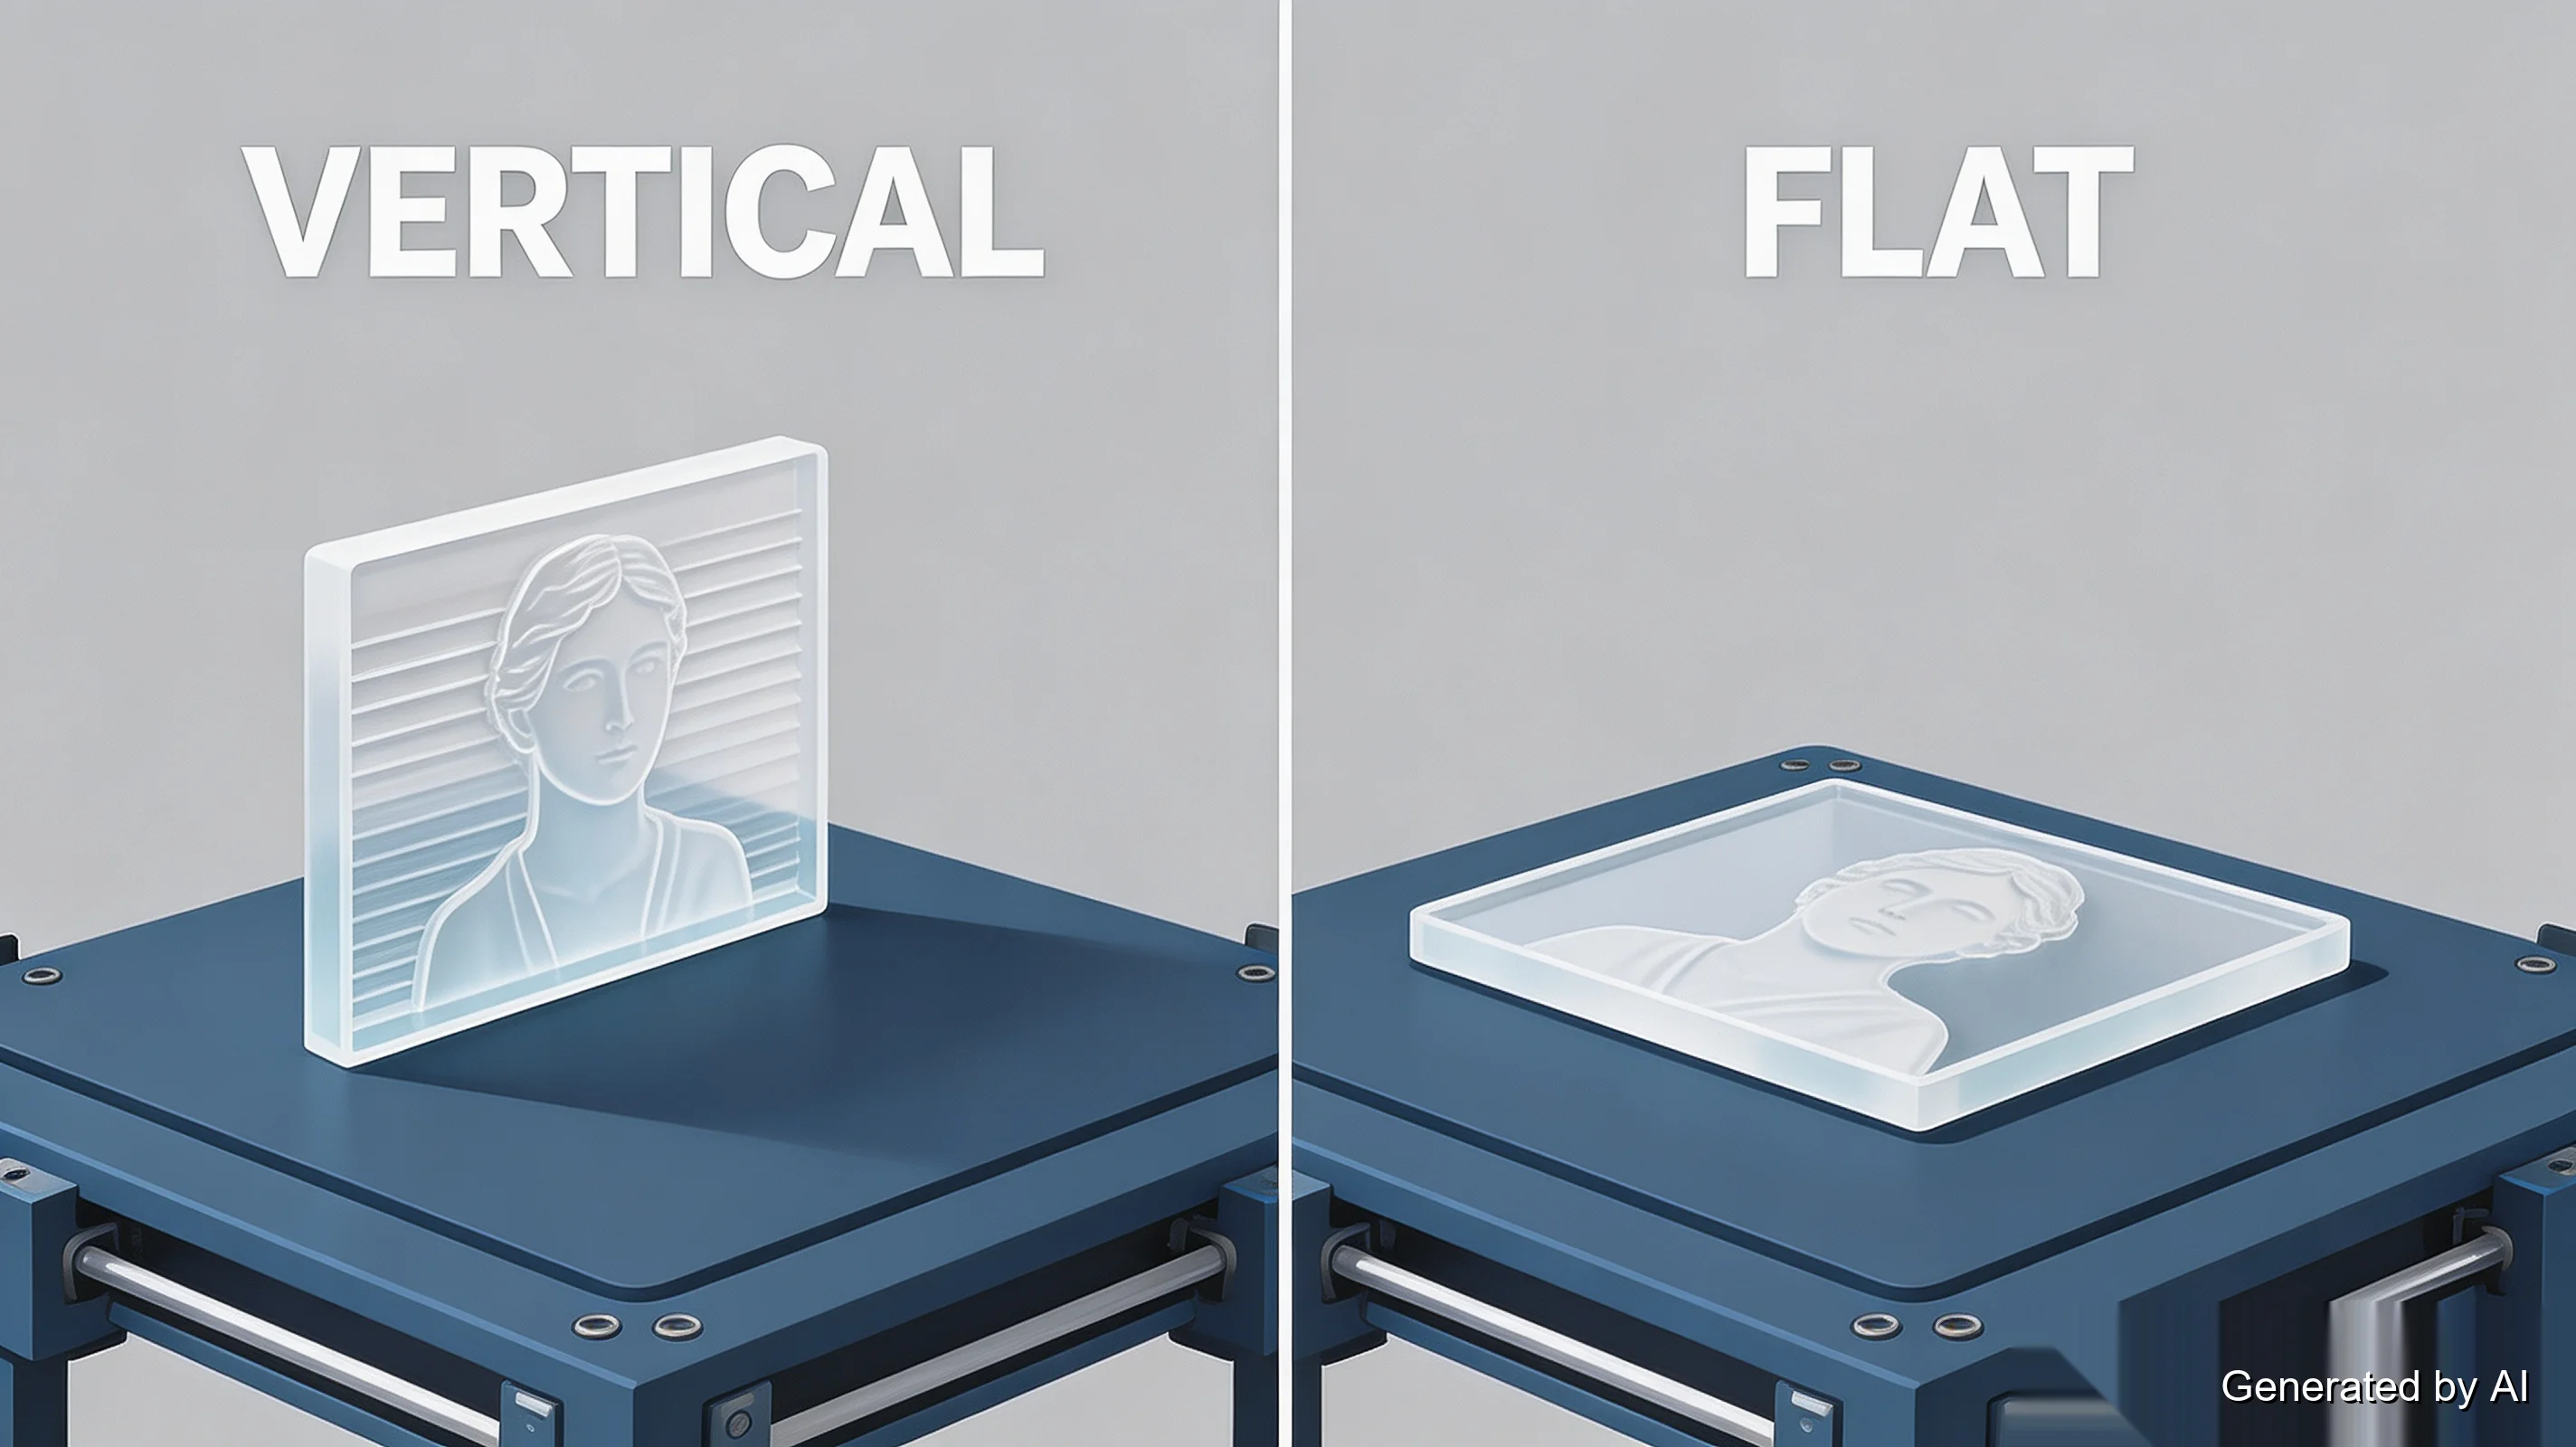
- Print it. Orientation is the big call: vertical on its edge for quality, flat for simplicity. The trade-offs get their own section below.
- Backlight and judge. A white LED around 300–600 lumens, a few centimeters behind the plate. Judge the result only under that light: a lithophane evaluated under ceiling lighting always looks wrong.
Best Lithophane Generators
Every tool on this list runs the same photo-to-lithophane conversion. The differences are in the controls, and the right pick depends on your workflow:
| Generator | Best for | Controls worth knowing |
|---|---|---|
| ItsLitho | Full control | Form factors (flat plates, curved shades, night-light boxes), keyhole slots, edge frames |
| 3DP Rocks | Fastest for plain flat plates | Minimal set: width, thickness, resolution — done in a minute |
| LithophaneMaker | Preset shapes | Ready-made profiles for the common forms |
| Cura image import | Staying in the slicer | Drag an image onto the build plate; basic height settings |
All four do the same image-to-lithophane job, so pick by workflow rather than by quality: the source photo matters more than any of these tools, and every exported STL passes through the same slicer afterward.
Best Lithophane Print Settings
Four settings have the biggest impact on lithophane quality. For a typical FDM print, start with the following values:
| Setting | Value | Why |
|---|---|---|
| Layer height | 0.06–0.12mm | Each layer is a row of the image; finer layers give smoother tonal transitions. Below about 0.05mm the visual improvement becomes increasingly subtle while print time keeps climbing |
| Infill | 100% | The relief *is* the shape; any sparse infill shows through as blotches |
| Orientation | Vertical (on edge) | Each layer traces one line of the image and the light path stays uniform through the plate |
| Nozzle | 0.4mm (standard) | Small enough for detail, large enough to extrude the thin sections reliably |
For size, typical starting points look like this:
| Purpose | Typical starting size |
|---|---|
| First flat plate | ~100mm wide, 2–3mm total thickness |
| Framed print | ~150mm wide (fits a standard 6-inch frame) |
Larger plates amplify every flaw in the source photo and every layer line in the print. Start small, and scale up once the first plate looks good under backlight.
Everything else starts at your usual PLA profile: speed around 50mm/s, temperature at the upper end of your filament's range for layer bonding, no supports for a flat plate. Values vary by brand and batch, so treat any single table as a starting point, not a spec.
Vertical or flat? Both work; they optimize for different things. Vertical wins on image quality: the surface reads clean, and the plate stands on its smallest face so almost nothing touches the image area. Its costs: taller prints, a brim for bed adhesion, and a topple risk on tall plates. Flat is simpler and faster and nearly immune to tipping, but the first layers carry the entire image face and any texture telegraphs through it. For a first lithophane, print vertical with a brim; switch to flat for small, thick plates that would wobble on their edge.
One more check before you commit a long print: converters export raw numbers, and what "100" means depends on the tool. Confirm the real size in a viewer first — the checklist in our how to open STL files guide takes two minutes and has saved more than one overnight print from printing at postage-stamp scale.
Choosing the Right Photo
The generator cannot add information the photo does not have. These three factors decide most of the outcome, in order of importance:
Contrast first. The image lives in the difference between light and dark. A portrait lit evenly from the front converts cleanly; a face half-lost in shadow converts to a face half-missing. Strong side light looks dramatic on screen and produces plates where one cheek simply does not exist.
Resolution second. The plate's detail ceiling is the photo's pixel count. A 480px thumbnail blown up to a 150mm plate has roughly a third of a millimeter per pixel. That is the finest detail the plate can possibly carry. Export the original file, not a screenshot of it; compression artifacts become physical lumps.
Background third. Dark backgrounds convert to thick, sturdy borders that frame the image and protect the thin areas from handling. Busy backgrounds convert to noise. A studio-style setup (subject, plain background, frontal light) needs no editing. A snapshot usually needs cropping before it converts well.
Portraits, pets, and landscapes each have their traps. Faces need both eyes at the same brightness; a pet's dark fur against a dark floor reads as a floating head; a landscape with a bright sky converts to a plate that is mostly paper-thin at the top and snaps there. When a photo matters to someone, generate two versions (one as-is, one with contrast bumped) and print both. The comparison teaches more than any settings table.
Lithophane Materials Compared
| Material | Backlight look | Trade-offs |
|---|---|---|
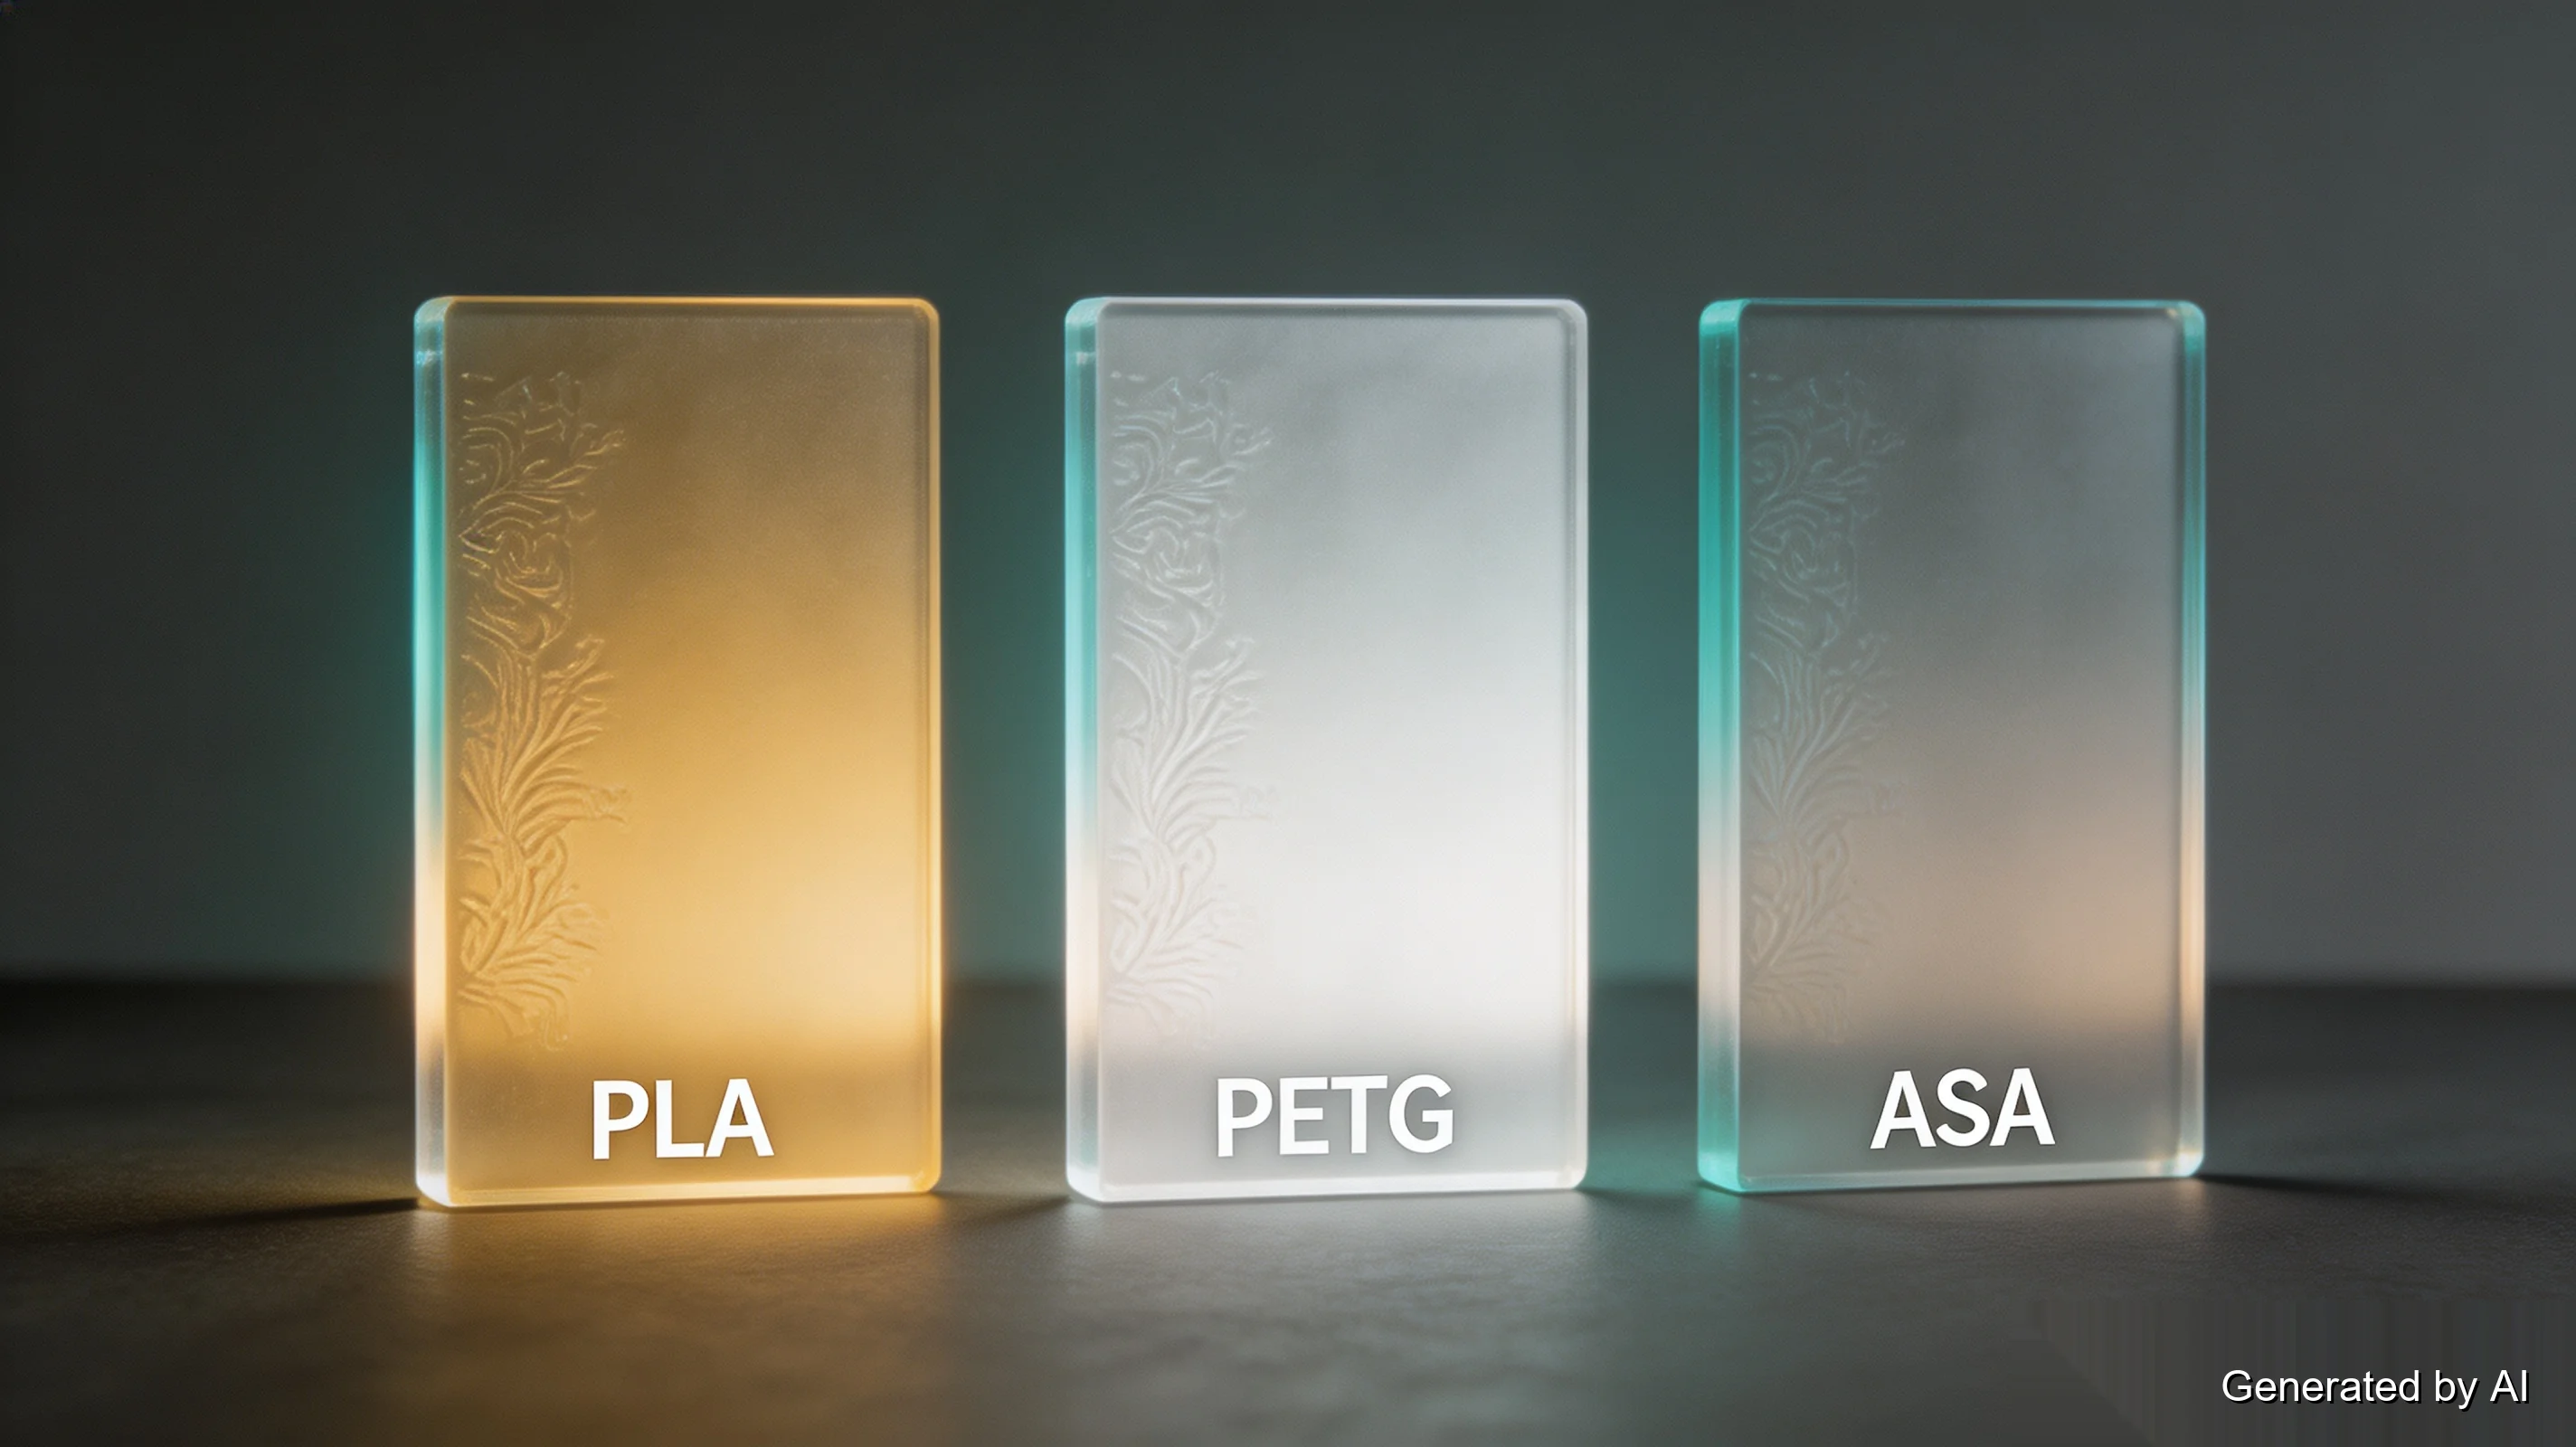
| White/natural PLA | Warm, even glow; the classic look | The default for a reason — cheap, dimensionally stable, prints everywhere |
| Translucent PETG | Slightly cooler glow; more durable plate | Stringier to print; needs drier storage |
| ABS / ASA | Neutral glow; handles heat and sun | Warps without an enclosure — only worth it for backlit outdoor placements |
| Translucent resin | Detail an order of magnitude finer than FDM | Needs an SLA (stereolithography) printer or a service; standard resin handling precautions apply |
Opaque filaments are disqualified by mechanism, not preference: if light cannot pass through the thin zones, there is no image. Color matters less than people expect (the backlight supplies the hue), but deep colors cost brightness.
Resin deserves a closer look, because the precision gap is structural: SLA cures layers of 0.025–0.1mm against a 0.4mm FDM nozzle's minimum reliable feature, roughly an order of magnitude finer, and that difference decides whether a lithophane holds eyelashes, film grain, and the soft gradations of a face or smears them. Translucent resins exist for exactly this job. The workflow is identical on the conversion side; only the printing and post-curing differ. If the photo is one you cannot reprint (a wedding portrait, a memorial), this is the one case where sending the STL to an SLA printing service beats debugging a desktop machine.
Shapes, Frames & Backlighting
Most 3D printed lithophanes start as a flat plate, and flat is where your first two or three should stay. The curved forms are where lithophanes stop being pictures and start being objects. Each form changes the conversion, not just the printing:
- Flat plate — the default; generators add a frame border by default, and standing prints need a brim
- Framed insert — sized to a standard photo frame; the backlight is a LED strip behind the mat board
- Curved lamp shade / cylinder — the relief wraps around a light source; check the minimum wall thickness at the thinnest point of the curve, and expect supports
- Night-light box — a hollow box with the plate as one face; the converter generates these as a single form factor
Backlighting is the half of the project nobody budgets for. Warm-white LEDs flatter portraits; cool-white reads truer on landscapes; a yellowed bulb distorts everything toward sepia. As a starting point, around 300–600 lumens from a few centimeters away covers a 100mm plate — a single LED bulb, a strip, or a small light box all work. The plate should never touch the light source: the hot spot reads as a blown-out white blotch.
Common Lithophane Problems
Run this sequence before blaming the printer:
- Too dark overall — the plate has too much plastic in the light path. Lower the maximum thickness first (2mm changes what 3mm could not). Still dark: brighten the source photo, then check the backlight is actually bright enough.
- Too light / washed out — the reverse. Raise the maximum thickness, darken the photo, or accept that a very bright image converts to a very empty plate.
- Visible horizontal banding — layer lines crossing the image. Drop layer height a step and slow down 20%.
- Cracked at the top or snapped while printing — thin zones are structural weak points. Keep the minimum thickness around 0.4mm as a starting point for many FDM setups, print vertical with a brim, and resize in the generator, not in the slicer: scaling the finished STL scales its thickness too, and a globally thicker plate prints darker than the one you previewed.
When Should You Use a 3D Printing Service?
A desktop printer handles most of the lithophanes in this guide. These are the cases where a service is the better tool:
- The photo cannot be reprinted — wedding portraits, memorials — where a failed print is a real loss
- Large-format plates, where print time runs past a day and the crack risk in thin zones grows with size
- High-detail portraits, where resin's finer resolution earns its keep
- Curved lamp shades and multiple copies, where consistency matters more than tinkering
If any of these sound like your job, convert the photo with any generator above and upload the model for an instant quote: manufacturability checks run automatically, and an engineer reviews the model before anything prints.
FAQ about Lithophane 3D Print
Q: How do you 3D print a lithophane?
Five steps: pick a high-contrast photo, convert it to STL in a generator like ItsLitho or 3DP Rocks (negative image for standard photos), slice with 0.06–0.12mm layers and 100% infill, print the plate vertically on its edge, and judge it under a backlight. The conversion takes minutes; the print takes hours.
Q: What layer height is best for lithophanes?
0.06–0.12mm is a practical starting range for detailed FDM lithophanes. Lower layer heights can produce smoother tonal transitions because each layer is one row of the image, but the visual improvement becomes increasingly subtle below about 0.05mm while the print time keeps climbing.
Q: Do you print lithophanes vertically or flat?
Vertical for quality, flat for simplicity. Vertical keeps the image surface clean and the light path uniform; flat is easier and more stable but puts every first-layer flaw on the face of the image. Rule of thumb: a plate taller than it is wide goes vertical; small, thick ones go flat.
Q: What filament is best for lithophanes?
White or natural PLA — translucent, cheap, and dimensionally stable. Translucent PETG trades a little glow for durability, ASA survives outdoor backlighting, and translucent resin on an SLA machine holds the finest detail of all. Fully opaque filaments generally do not produce the traditional backlit effect: no light through the thin zones means no image.
Q: Why does my lithophane look too dark?
Too much plastic in the light path. Lower the maximum thickness first, then brighten the source photo, then verify the backlight (300–600 lumens of white light is a typical starting point). Judge only under the backlight; under room lighting every lithophane looks wrong.
Q: What is the best image format for a lithophane?
Use the highest-resolution original you have. JPEG and PNG both work — the converter reads brightness either way — but avoid screenshots and heavily compressed files: every compression artifact becomes a physical lump on the plate.
Q: How thick should a 3D printed lithophane be?
A typical first plate runs about 2–3mm total with the thinnest zones near 0.4mm, though the right values vary with printer, filament, and how dark you want the image. Thickness is the exposure control: thicker plates read darker, so start in that range and adjust by result.
Q: Can a 3D printing service print lithophanes from my photo?
Yes — convert the photo to an STL with any generator above, then upload it to the service: manufacturability checks run automatically and an engineer reviews the model before printing. Resin options give the best detail for portraits you cannot afford to reprint; the section above lists the cases where this beats printing at home.
From Photo to Glow
A lithophane is the rare project where the printer is the easy part. Pick a photo with real contrast, let the generator do its one simple job, honor the settings that matter, and give the plate a proper light to live behind. Do that, and a shelf of white plastic becomes a shelf of photographs that only you can switch on. When the photo deserves better than a desktop machine can give — or the plate needs resin's detail — the upload is one step away.
Keep Learning
5 Essential 3D Printed Gaming Accessories
(source: FreePik) 3D printing gives gamers something off-the-shelf gear rarely does: control. Control over comfort, setup, and how every piece of equipment fits into your play style. Whether you're on PC, console, or deep into tabletop gaming, there's a whole world of printable accessories that don’t just work, they work for you. You don’t need to go full engineer and build your own mouse from scratch (unless you want to). Even simple upgrades, like better controller grips or custom storage, can make ......
Lithophane 3D Print: How to Print Photos That Glow
Key Takeaways A lithophane 3D print turns a photo into a backlit relief plate: thin areas pass light and read bright, thick areas block it and read dark. The image only appears when you put a light behind it. Most converters follow one basic principle: image brightness becomes physical thickness. Photos typically convert as a negative, white-background logos as a positive — but the preview is the real check. Pick wrong and the print shows an eerie inverted ghost. Four settings carry most of the qualit......
20 Best 3D Printed Fidget Toys in 2026 (STL Sources & Settings)
Key Takeaways Best overall: HelixCore for advanced makers who want a challenging mechanical fidget. Best for beginners: Mini Clicker, Classic Fidget Spinner, and Infinity Cube. Best print-in-place design: Planetary Gear Spinner, which can be printed as a single assembled piece without additional hardware. Best material: PLA is a good starting material for most fidget toys, while PETG can be a better choice when greater toughness or repeated flexing is required. Recommended starting settings: Many mode......
How 3D Printing Makes Complex Jewelry Design More Accessible
For jewelers and designers, bringing incredibly detailed and custom visions to life is paramount. Traditional jewelry making often involves careful handcrafting or complex mold-making processes. Today, 3d printed jewelry techniques are providing powerful new ways to design and produce pieces, from initial concepts to finished items, addressing key industry needs for precision, customization, and efficiency. How 3D Printing is Improving Jewelry Design and Manufacturing 3D printers at JLC3DP The core ad......
Beyblade 3D Model: Top Free Downloads & Pro Design Tips 2026
Back in the early days, bladers were just swapping parts and testing combos. Fast forward to 2026, things look a whole lot different. Now, the most competitive players aren’t just battling, they’re engineering. (source: Reddit) Sure, grabbing a Beyblade 3D model free download is the easy entry point. But if you really want an edge, it’s about going beyond surface-level files and building models that have performance baked in. That means precision design, tested materials, and a little pro-level know-h......
JLC3DP Creator Spotlight: Get Featured for Your 3D Printing Project
Introduction Great 3D printing projects aren’t just about the final part—they’re about the problem you solved, the design decisions you made, and how manufacturing brought it all together. The JLC3DP Creator Spotlight is a customer case submission contest designed to celebrate real creators and real-world projects. Share your experience using JLC3DP’s 3D printing services, get featured on our official channels, and earn rewards along the way. From functional prototypes to finished products, this is wh......