How Do Resin 3D Printers Work? A Beginner's Guide
18 min
- What Is a Resin 3D Printer?
- How Resin 3D Printing Works: The Print Cycle
- Resin Safety: What You Must Know First
- Preparing Your First Resin Print
- Washing and Curing: Why Post-Curing Matters
- Resin vs FDM: When Resin Is the Right Call
- FAQ about How Do Resin Printers Work? Resin 3D Printing Explained
- From Vat to Finished Part
Key Takeaways
- A resin 3D printer works by curing each layer of liquid photopolymer with light — either tracing the layer with a laser or exposing it through a projected or masked image. A build plate dips into a shallow vat of resin, and the layer hardens only where light reaches it.
- The print cycle runs on a rhythm fused deposition modeling (FDM) machines do not have: expose the layer, peel it off the film at the bottom of the vat, let fresh resin flow back, and repeat. A 50mm part at 0.05mm layers takes 1,000 of those cycles.
- Uncured resin is a skin sensitizer and irritant, so nitrile gloves, ventilation, and eye protection belong in the setup. The liquid is the hazardous part; how safe a fully cured part is depends on the resin formulation and the manufacturer's safety data sheet.
- Post-curing is not a cosmetic step. It helps the washed part reach the mechanical and surface properties specified by the resin manufacturer.
- Resin is the stronger choice for small parts with fine detail and smooth surfaces. FDM is often the better fit for large parts, structural strength, and outdoor exposure — the decision follows the geometry, not a preference.
Resin 3D printing answers a narrow question with a strange machine: what if you built an object by pulling it out of a puddle, one slice at a time? A resin 3D printer cures liquid photopolymer with light, layer by layer, drawing each cross-section out of a vat instead of pushing melted plastic through a nozzle. That difference in light and chemistry is why a desktop resin machine can hold detail a filament printer cannot reach — and why it comes with a print cycle, a safety routine, and a post-processing step that FDM users never think about. So how do resin printers work? The short answer: light cures liquid resin against a build plate — traced layer by layer with a laser on SLA machines, or flashed as a full image on DLP and MSLA machines. This guide walks through what a resin printer is, how the print cycle actually runs, what to know before your first print, and when resin is the right process for a part.
What Is a Resin 3D Printer?
A resin 3D printer is a machine that builds parts by solidifying liquid photopolymer resin with light. The resin sits in a vat, a build platform moves through it, and a light source cures the resin wherever the current layer's cross-section is. The part grows layer by layer until it hangs off the platform as a solid object.
The chemistry behind it is photopolymerization. In plain terms: the resin contains light-sensitive ingredients, and light flips them from liquid to solid. Liquid resin is a mix of monomers, oligomers, and a photoinitiator that reacts to a specific wavelength — in the UV range, around 405nm on desktop machines. When light of that wavelength reaches the resin with enough energy, the photoinitiator triggers a chain reaction that links the molecules into a solid polymer network. Areas that receive no light stay liquid and get reused on the next print.
That single mechanism is shared across every resin process in commercial use. What separates them is how the light is delivered:
| Process | Light source | How one layer forms |
|---|---|---|
| SLA (stereolithography) | UV laser | A mirror-steered laser traces the cross-section point by point |
| DLP (digital light processing) | Projector with a DMD chip | The whole layer flashes at once as a projected image |
| MSLA (LCD) | LED array behind an LCD screen | The screen masks the light, curing through its transparent pixels |
SLA vs DLP vs MSLA: What's the Difference?
All three build parts the same fundamental way — layer by light-cured layer — and differ mainly in how the light is delivered. SLA's laser traces each cross-section point by point, which gives it the cleanest edges and keeps it the workhorse of industrial resin production. DLP exposes the whole layer at once through a projector for speed, and MSLA brings that same full-layer trick to desktop machines through an affordable LCD mask. For the detailed breakdown of how the light paths behave in practice, the SLA vs DLP comparison works through speed, surface finish, and cost side by side, and the DLP technology guide goes deeper on projector-based machines.
The term stereolithography was coined in 1984 by Chuck Hull, whose patent was granted in 1986 — the year he founded the company that brought the first commercial machine to market.
One structural detail matters for everything that follows. Most desktop resin printers are built upside down. The build plate hangs from above and lowers into a shallow vat whose bottom is a transparent film. Light comes from underneath, curing the layer against the plate rather than on the open surface of the resin. This is why the part grows downward as the plate rises, and why a thin film sits in the middle of the mechanics.
How Resin 3D Printing Works: The Print Cycle
A resin print is built in a five-step cycle: slice the model, expose the layer, peel it off the film, let resin flow back, and repeat. Every step shapes how the finished part behaves.
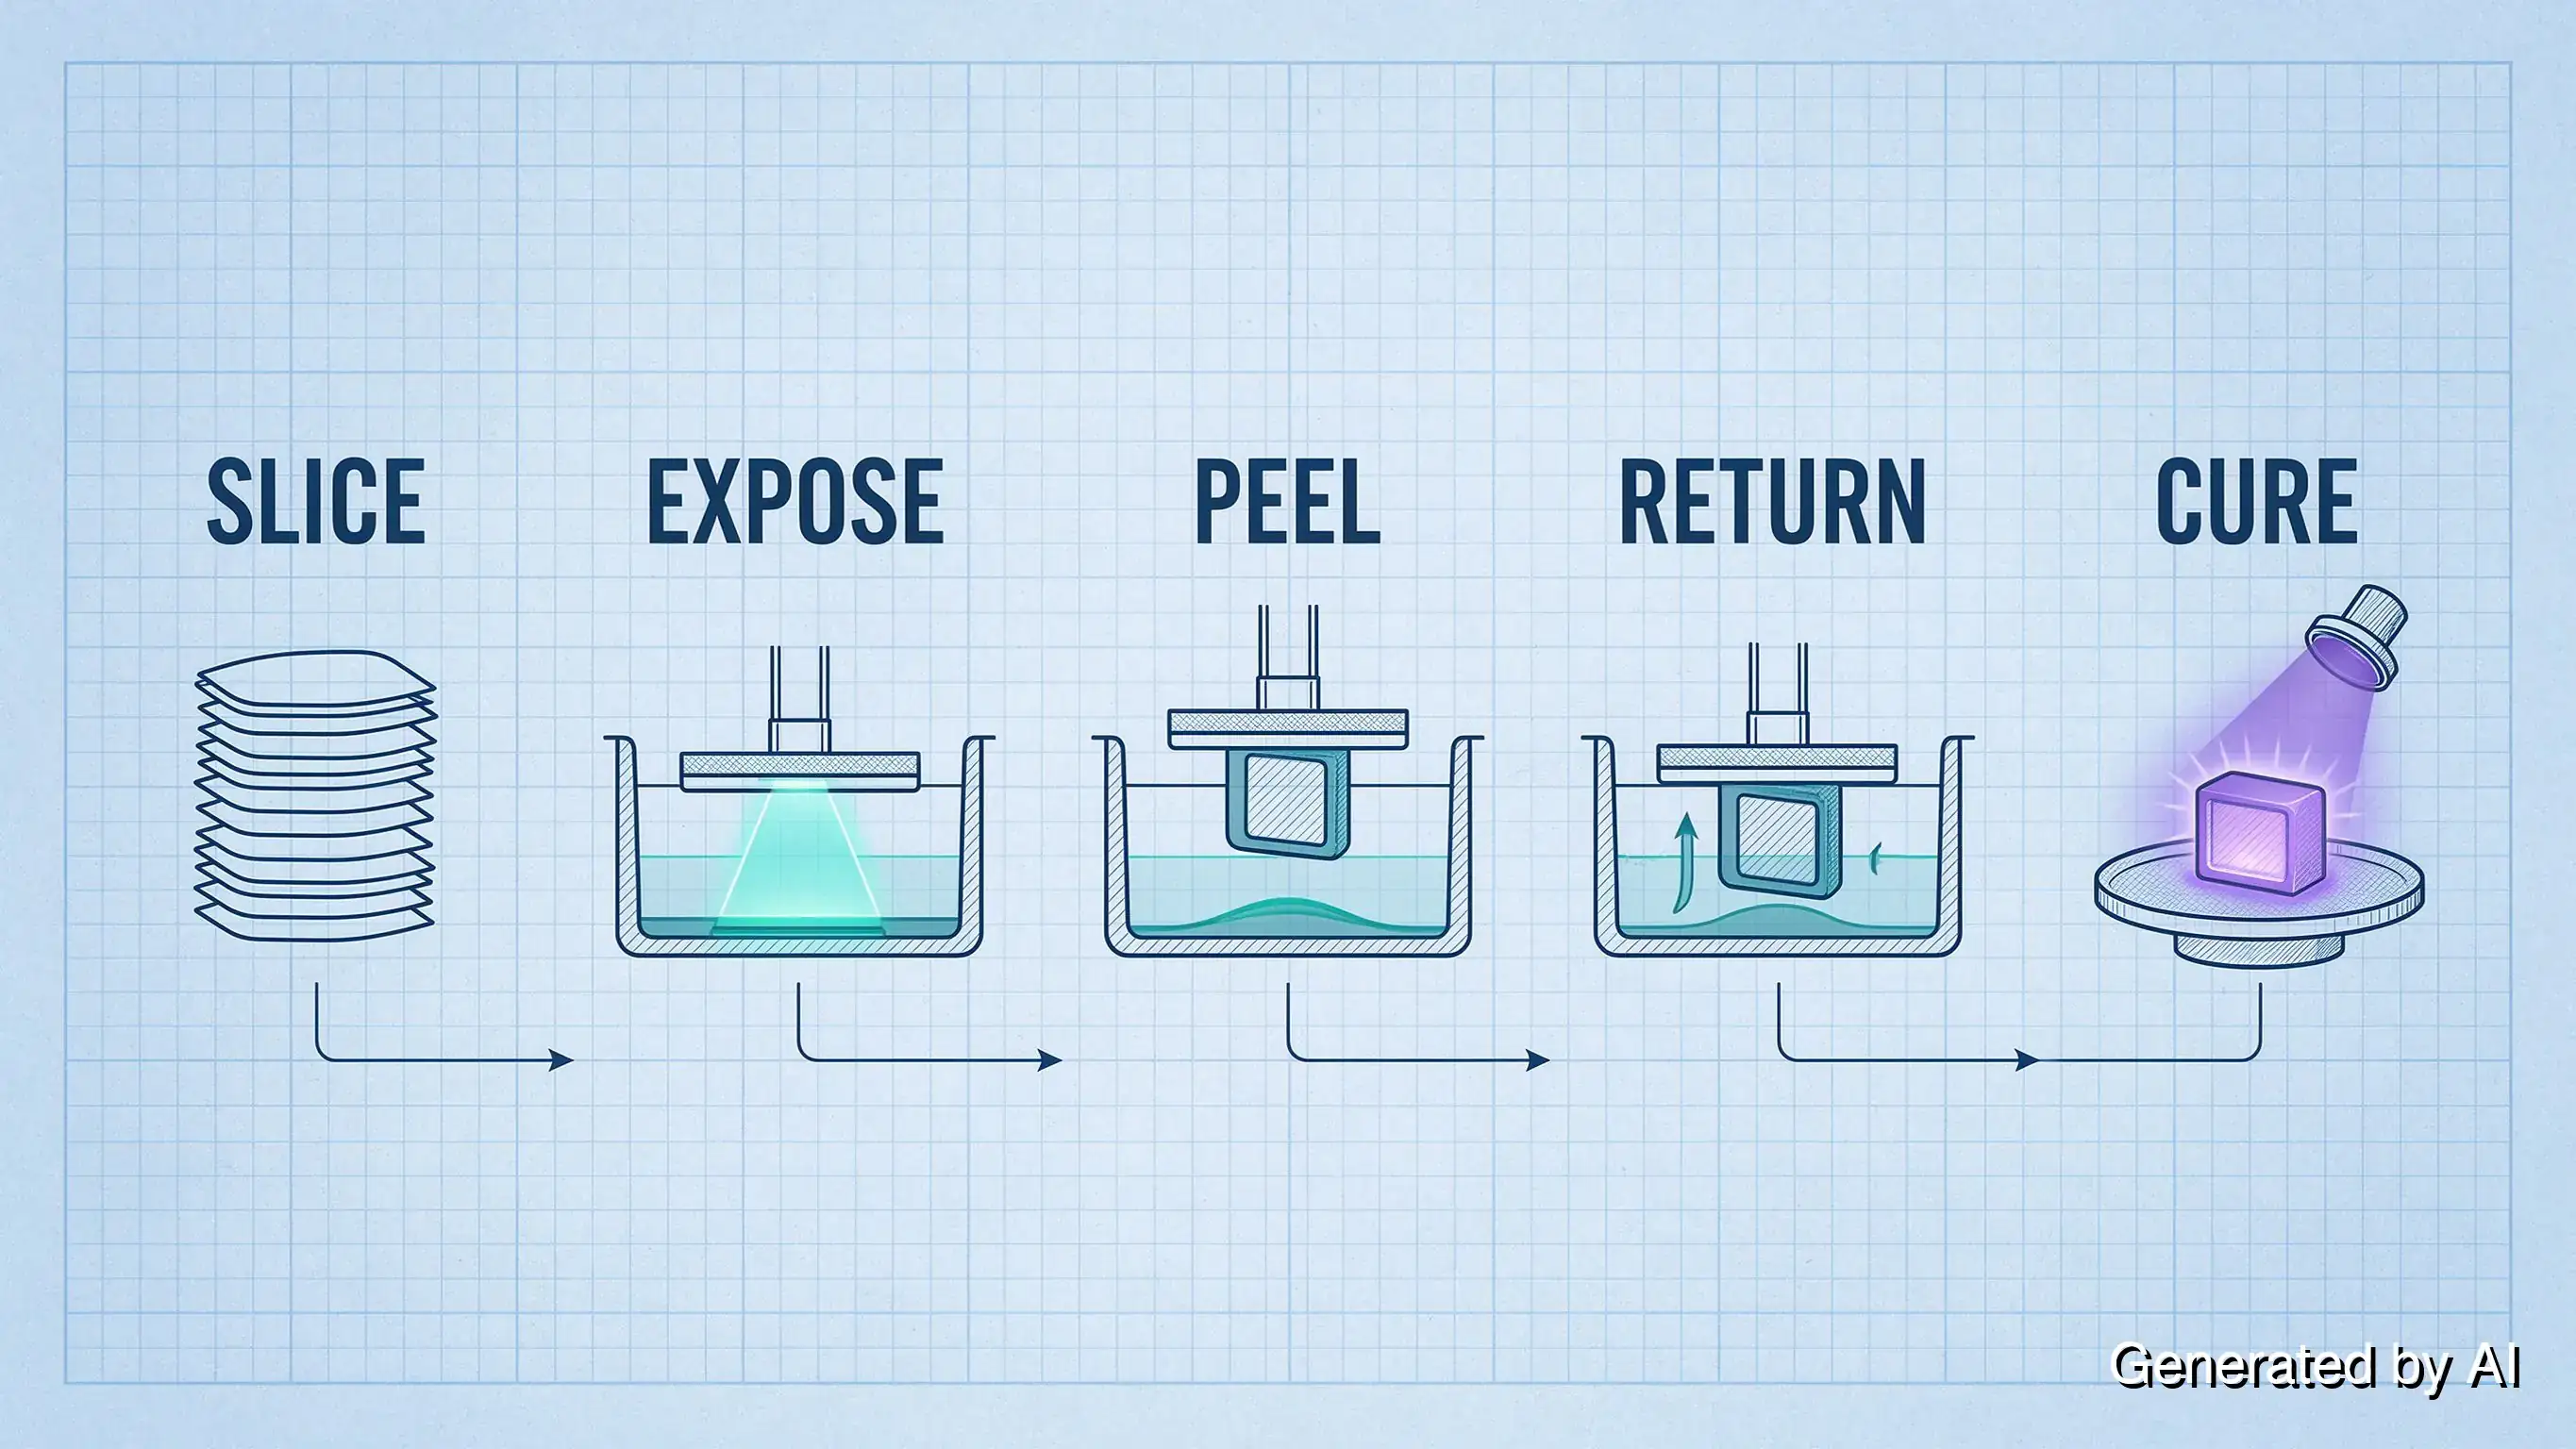
1. Slicing. A resin slicer converts the model into per-layer images plus support structures. Chitubox and Lychee Slicer handle most of this market, and they differ in ways that matter to beginners: Chitubox ships profiles tied closely to printer firmware and is the default on many machines, while Lychee draws users for its support generation and its pre-print checks for islands and suction cups. Both handle hollowing, drainage holes, and exposure calibration. What a resin slicer handles differently: it plans supports for a part hanging from a plate, not one sitting on a bed.
2. Exposure. The sliced image is projected or traced onto the resin through the transparent bottom of the vat. There is no nozzle and no travel path — the whole cross-section cures at once on a DLP or MSLA machine, or is traced by a laser on an SLA machine. Exposure time for a standard resin at 0.05mm lands between roughly 1.5 and 8 seconds per layer, with the number set by the resin, the layer height, and how much light the machine delivers. The first layers run longer on most printers, building a thicker base that grips the build plate for the rest of the print.
3. Peel. This step has no FDM equivalent and is the source of most resin-specific behavior. The freshly cured layer is bonded to the build plate above and stuck to the film below at the same time. The plate rises and pulls the layer off the film, breaking a light vacuum as it goes. In plain terms, peeling a cured layer off the film is like pulling a suction cup off glass — the bigger the cup, the harder it fights. The force involved is real, and it scales with the cross-sectional area of the part: a large, flat layer resists the peel much harder than a small one. This is why parts are tilted on the plate rather than laid flat, and why hollowing a large solid part measurably cuts the peak peel force.
A hollow part needs drain holes for the same reason. Sealing resin inside a cavity turns it into a suction cup: every peel pulls against a vacuum that has nowhere to release, and the part separates from the plate or tears at the shell. Drain holes placed at the lowest points of the cavity let the pressure equalize on each cycle, which is why slicers ship suction-cup detection alongside their hollowing tools.
4. Return and repeat. The plate drops back down, leaving a gap for fresh resin to flow under the cured layer, and the next image exposes. Layer heights commonly run from 0.025mm to 0.1mm, so a 50mm-tall model at 0.05mm works out to 1,000 cycles — each one including a full up-and-down movement of the plate.
5. Post-processing. The part comes off the plate wet with uncured resin still clinging to its surface. Washing and UV curing finish the job, and they are covered in their own section below because skipping them changes what the part physically is.
Two numbers govern the detail you can get, and they act in different directions. Resolution in the horizontal plane comes from the pixel or laser spot size. A 4K LCD panel about 135mm wide puts each pixel at roughly 35µm, so the smallest feature the machine can hold is a few pixels across — somewhere near 0.1mm in practice. Resolution in the vertical direction comes from layer height, and it is simply the thickness of each slice. A printer that lays down 0.03mm layers can produce a smoother vertical curve than one printing at 0.1mm, which is the parameter people trade against print time.
Resin Safety: What You Must Know First
The handling rules for resin differ from filament printing in kind: a filament printer needs ventilation for fumes, while a resin printer puts a photochemical irritant on your bench in liquid form.
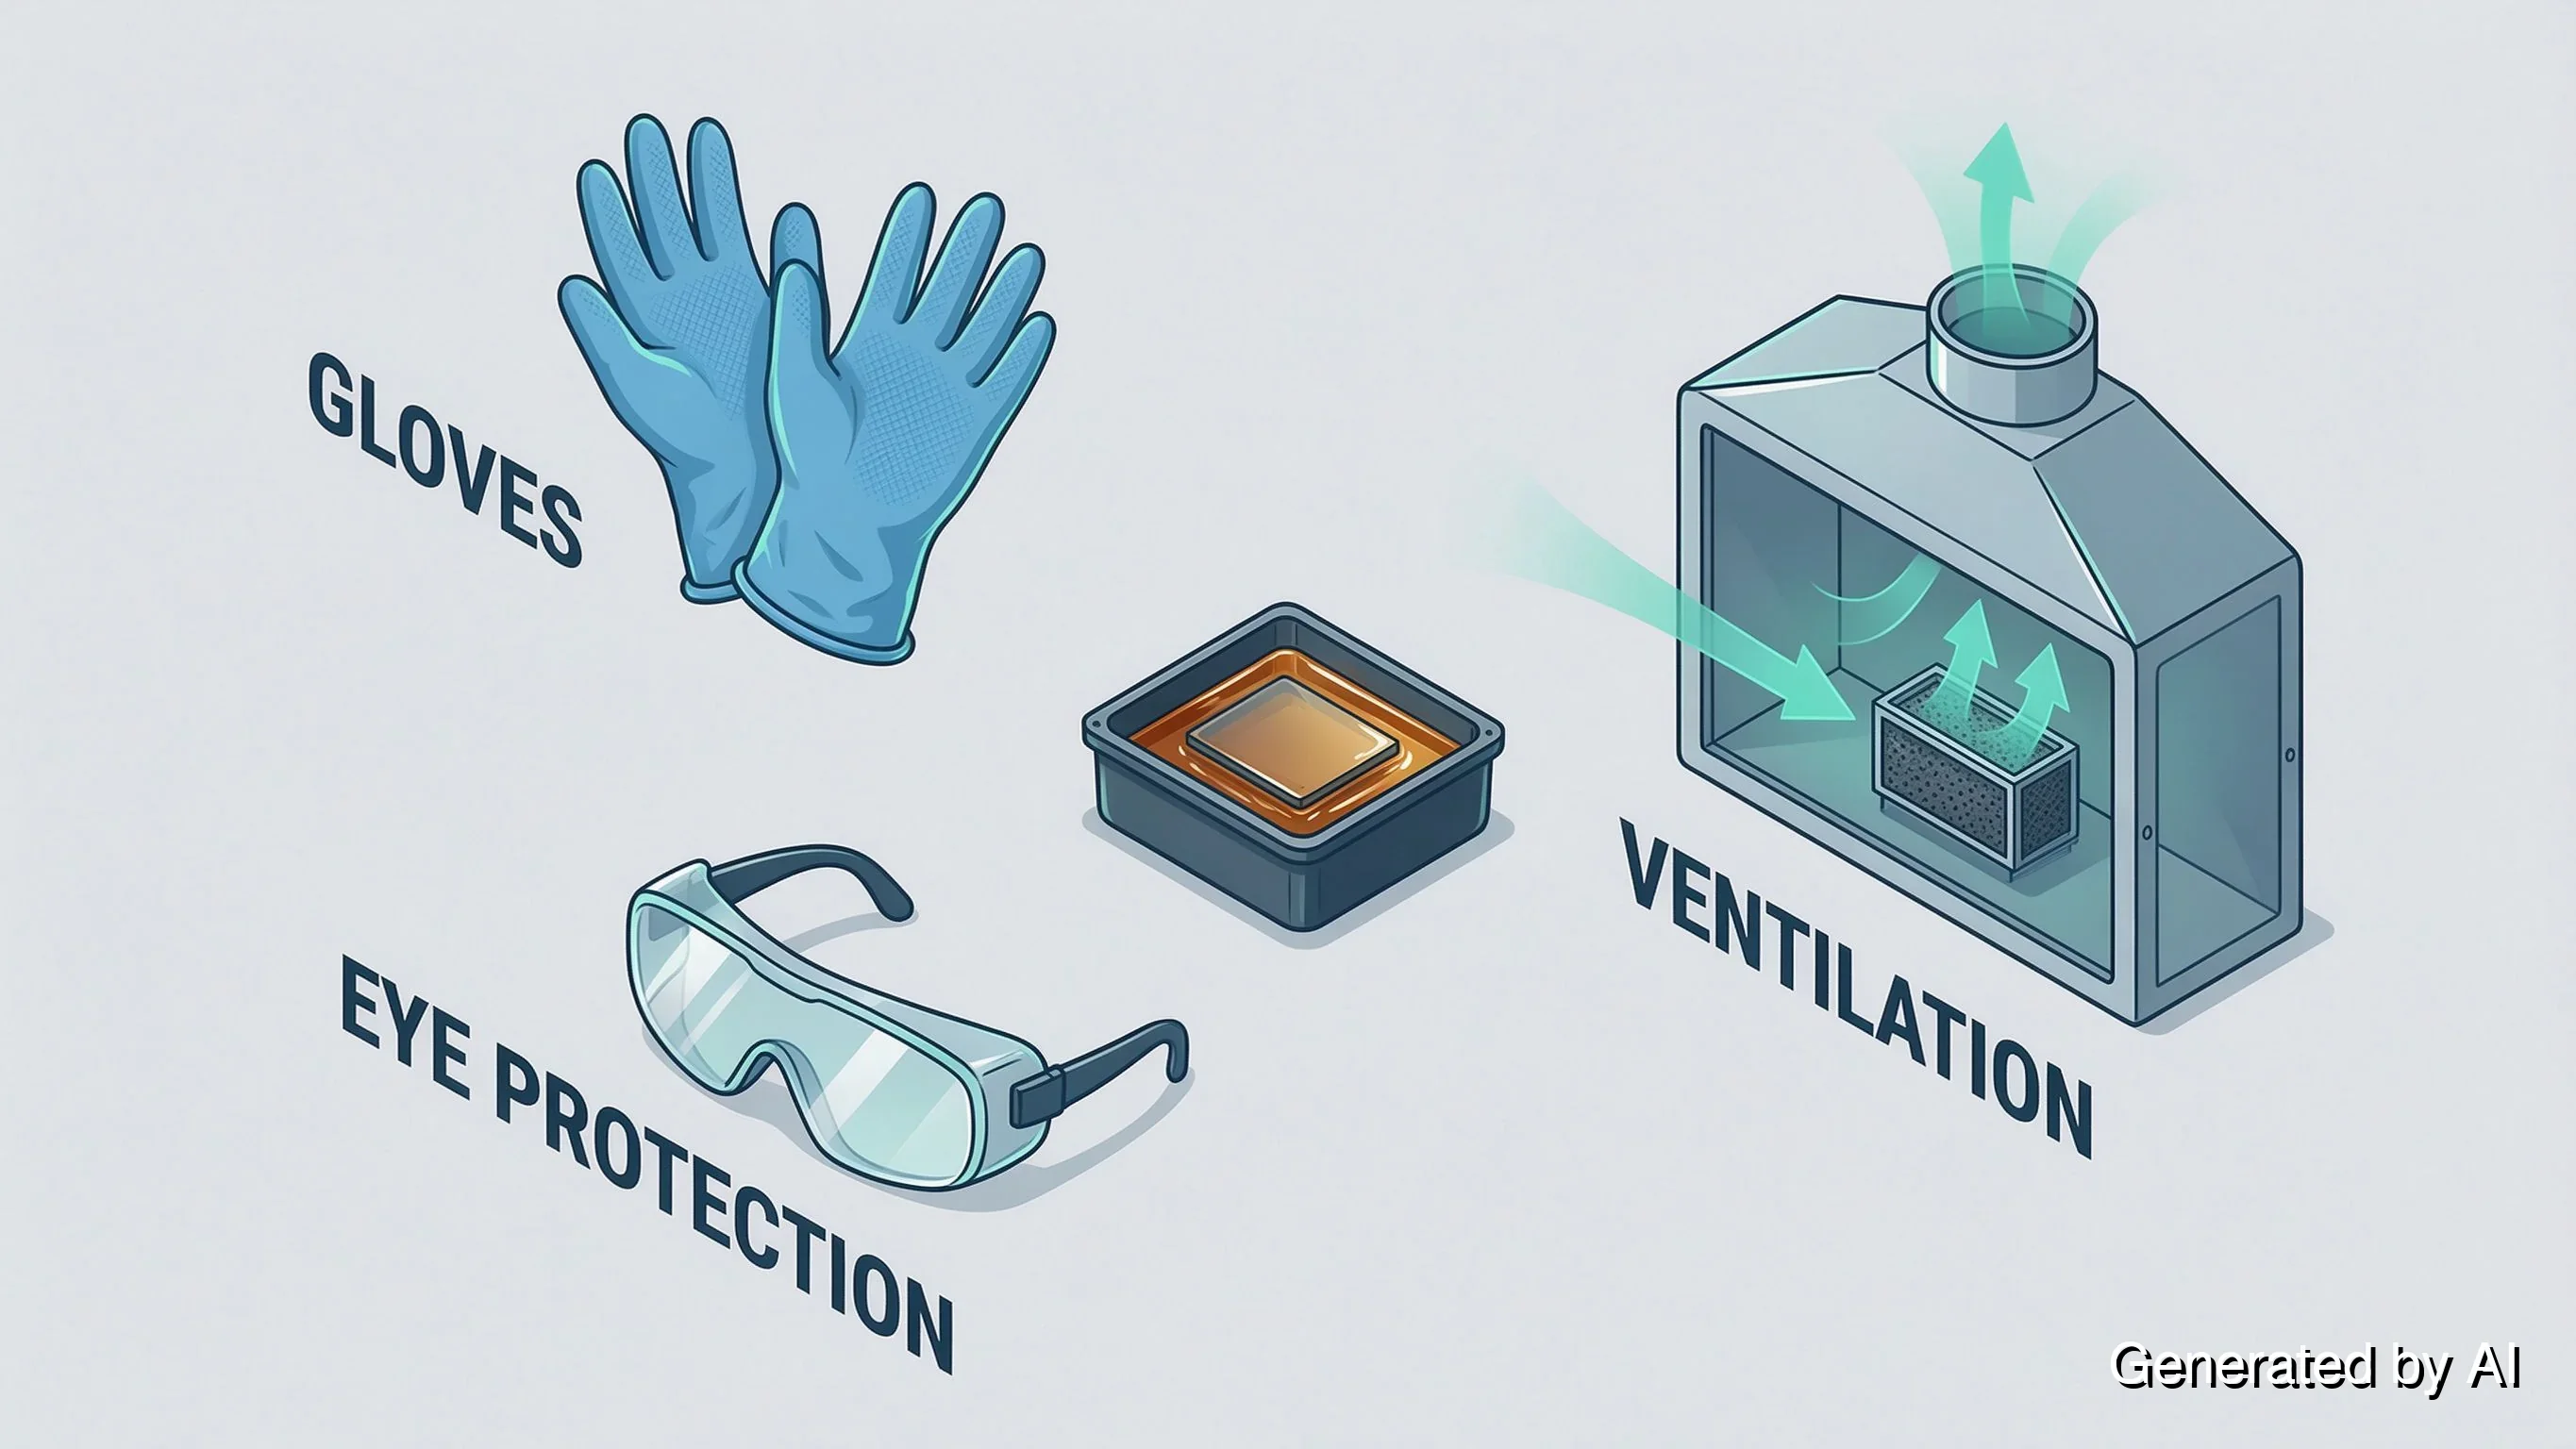
Uncured resin is a skin sensitizer and an eye and respiratory irritant. Repeated skin contact can produce an allergic response that gets worse with exposure rather than better, which is the part people underestimate — a single spill is not the risk, the habit is. The working setup is short: nitrile gloves for any contact with liquid resin or a wet part, ventilation or an enclosure with a carbon filter, and eye protection when you handle the vat or wash parts. Nitrile is the safer choice: latex offers noticeably less protection against resin permeation.
The state distinction is the thing to hold onto. Liquid and partially cured resin is the hazardous material. A fully cured part is a different story: once washed and post-cured, most standard resins produce a part that can be touched, sanded, and handled without gloves, which is why finished resin prints sit on desks and in display cabinets. How safe a given cured resin actually is depends on its formulation, the completeness of the cure, and the manufacturer's safety data sheet — a distinction that matters most for skin-contact applications, where the resin's rating and its SDS are the deciding references. Between those two states sits the "wet part" stage right after printing, where uncured resin is still on the surface and gloves still apply.
Waste handling follows the same logic: liquid resin, contaminated solvent, and wash water all need to be cured or disposed of as the resin's safety data sheet directs, not poured down a drain. If a print fails, exposure calibration and support strategy are the usual culprits, and the resin print failure guide walks through the common failures and their fixes.
Preparing Your First Resin Print
A first resin print succeeds or fails on three decisions: orientation, supports, and exposure. None is difficult, and all follow from the peel mechanics rather than from any machine setting.
Orientation. Because the layer is peeled off a film, the forces on a part depend on how much cross-sectional area each layer presents. Laying a flat part parallel to the plate gives every layer a large, stubborn area to peel. Tilting the part spreads the same area across many more layers, so each peel is smaller and the surface that faced the film avoids a single hard release line. A moderate tilt such as 30° to 45° is a useful starting point for some geometries, but the best orientation depends on the part shape, the support strategy, and the printer. Orientation also decides where supports land and which faces end up with contact marks, so it is worth deciding before supports are generated rather than after.
Supports. A resin part hangs from the build plate, so overhangs, islands, and low-angle faces need support they would not need on an FDM bed. Supports carry two loads here: holding the geometry during the print, and anchoring it against the peel. Sparse supports that would be adequate on a filament printer can tear a resin print off the plate halfway through. Auto-support in a slicer gets a beginner close, and the check worth running is island detection — unsupported regions floating in a layer, which will cure into the vat instead of onto the part.
Exposure. Every resin and printer combination has an exposure time that produces a properly cured layer, and getting it wrong shows up immediately: too short and the part is soft, warped, or missing features; too long and detail swells, fine gaps fill in, and the part grows slightly oversized. Test exposure calibration tiles, printed at several times on one small part, are the standard way to dial this in. Most printers ship with a starting profile for their own resin, and community-shared profiles cover most resin and machine combinations.
For the first print itself, pick something small with clear geometry and modest overhangs, print it in a standard grey resin whose behavior is well documented, and start from the default profile rather than tuning several parameters at once. A small part prints in a couple of hours and tells you whether orientation, supports, and exposure are in the right neighborhood — which is the information you actually need before committing to a long print.
Washing and Curing: Why Post-Curing Matters
A part straight off the build plate is not finished, and treating it as finished is a common beginner mistake.
Washing removes the liquid resin clinging to the surface. Isopropyl alcohol is the traditional solvent and still the most widely used; water-washable resin formulations are the alternative, and they trade solvent handling for wash water you still have to dispose of properly rather than pour down a drain. Washing is done before support removal in most workflows, since softened supports come away more cleanly, and it needs to happen before any UV exposure — once residual surface resin cures, it locks in as a rough, glossy film.
Post-curing is the step that changes the material, not just the surface. Resin that has been exposed and washed has not finished reacting. Under UV light in a curing station, the remaining reactive groups continue to link, and the part reaches the mechanical strength and hardness its datasheet describes. Post-curing also drives residual surface resin toward full conversion, which is what allows a finished part to be handled bare-handed — and, for resins specifically rated for it, makes skin-contact and biocompatibility applications possible. Under-cured parts behave the way they feel: softer than expected, tacky on fine features, and prone to losing detail under light sanding.
How much UV is a matter of the resin and the part, and over-curing has its own symptoms — yellowing and brittleness on some formulations, especially thin transparent parts. Manufacturer guidance for the specific resin, plus a curing station with a turntable so all faces get exposure, covers the practical range.
Resin vs FDM: When Resin Is the Right Call
The two processes are not competing for the same parts. They split the work along predictable lines.
| What the part needs | Better fit | Why |
|---|---|---|
| Fine detail, smooth surfaces, small features | Resin | Light-based curing holds features a nozzle cannot |
| Miniatures, jewelry patterns, dental and castable parts | Resin | Detail density and surface finish are the whole point |
| Large parts, structural strength, impact resistance | Often FDM | Continuous thermoplastic layers handle load and scale |
| Outdoor exposure, UV and heat resistance | Often FDM | Engineering filaments such as ASA are formulated for it, though some high-performance resins also serve |
| Lowest cost per part at volume, everyday functional prints | FDM | Cheap material, big build volumes |
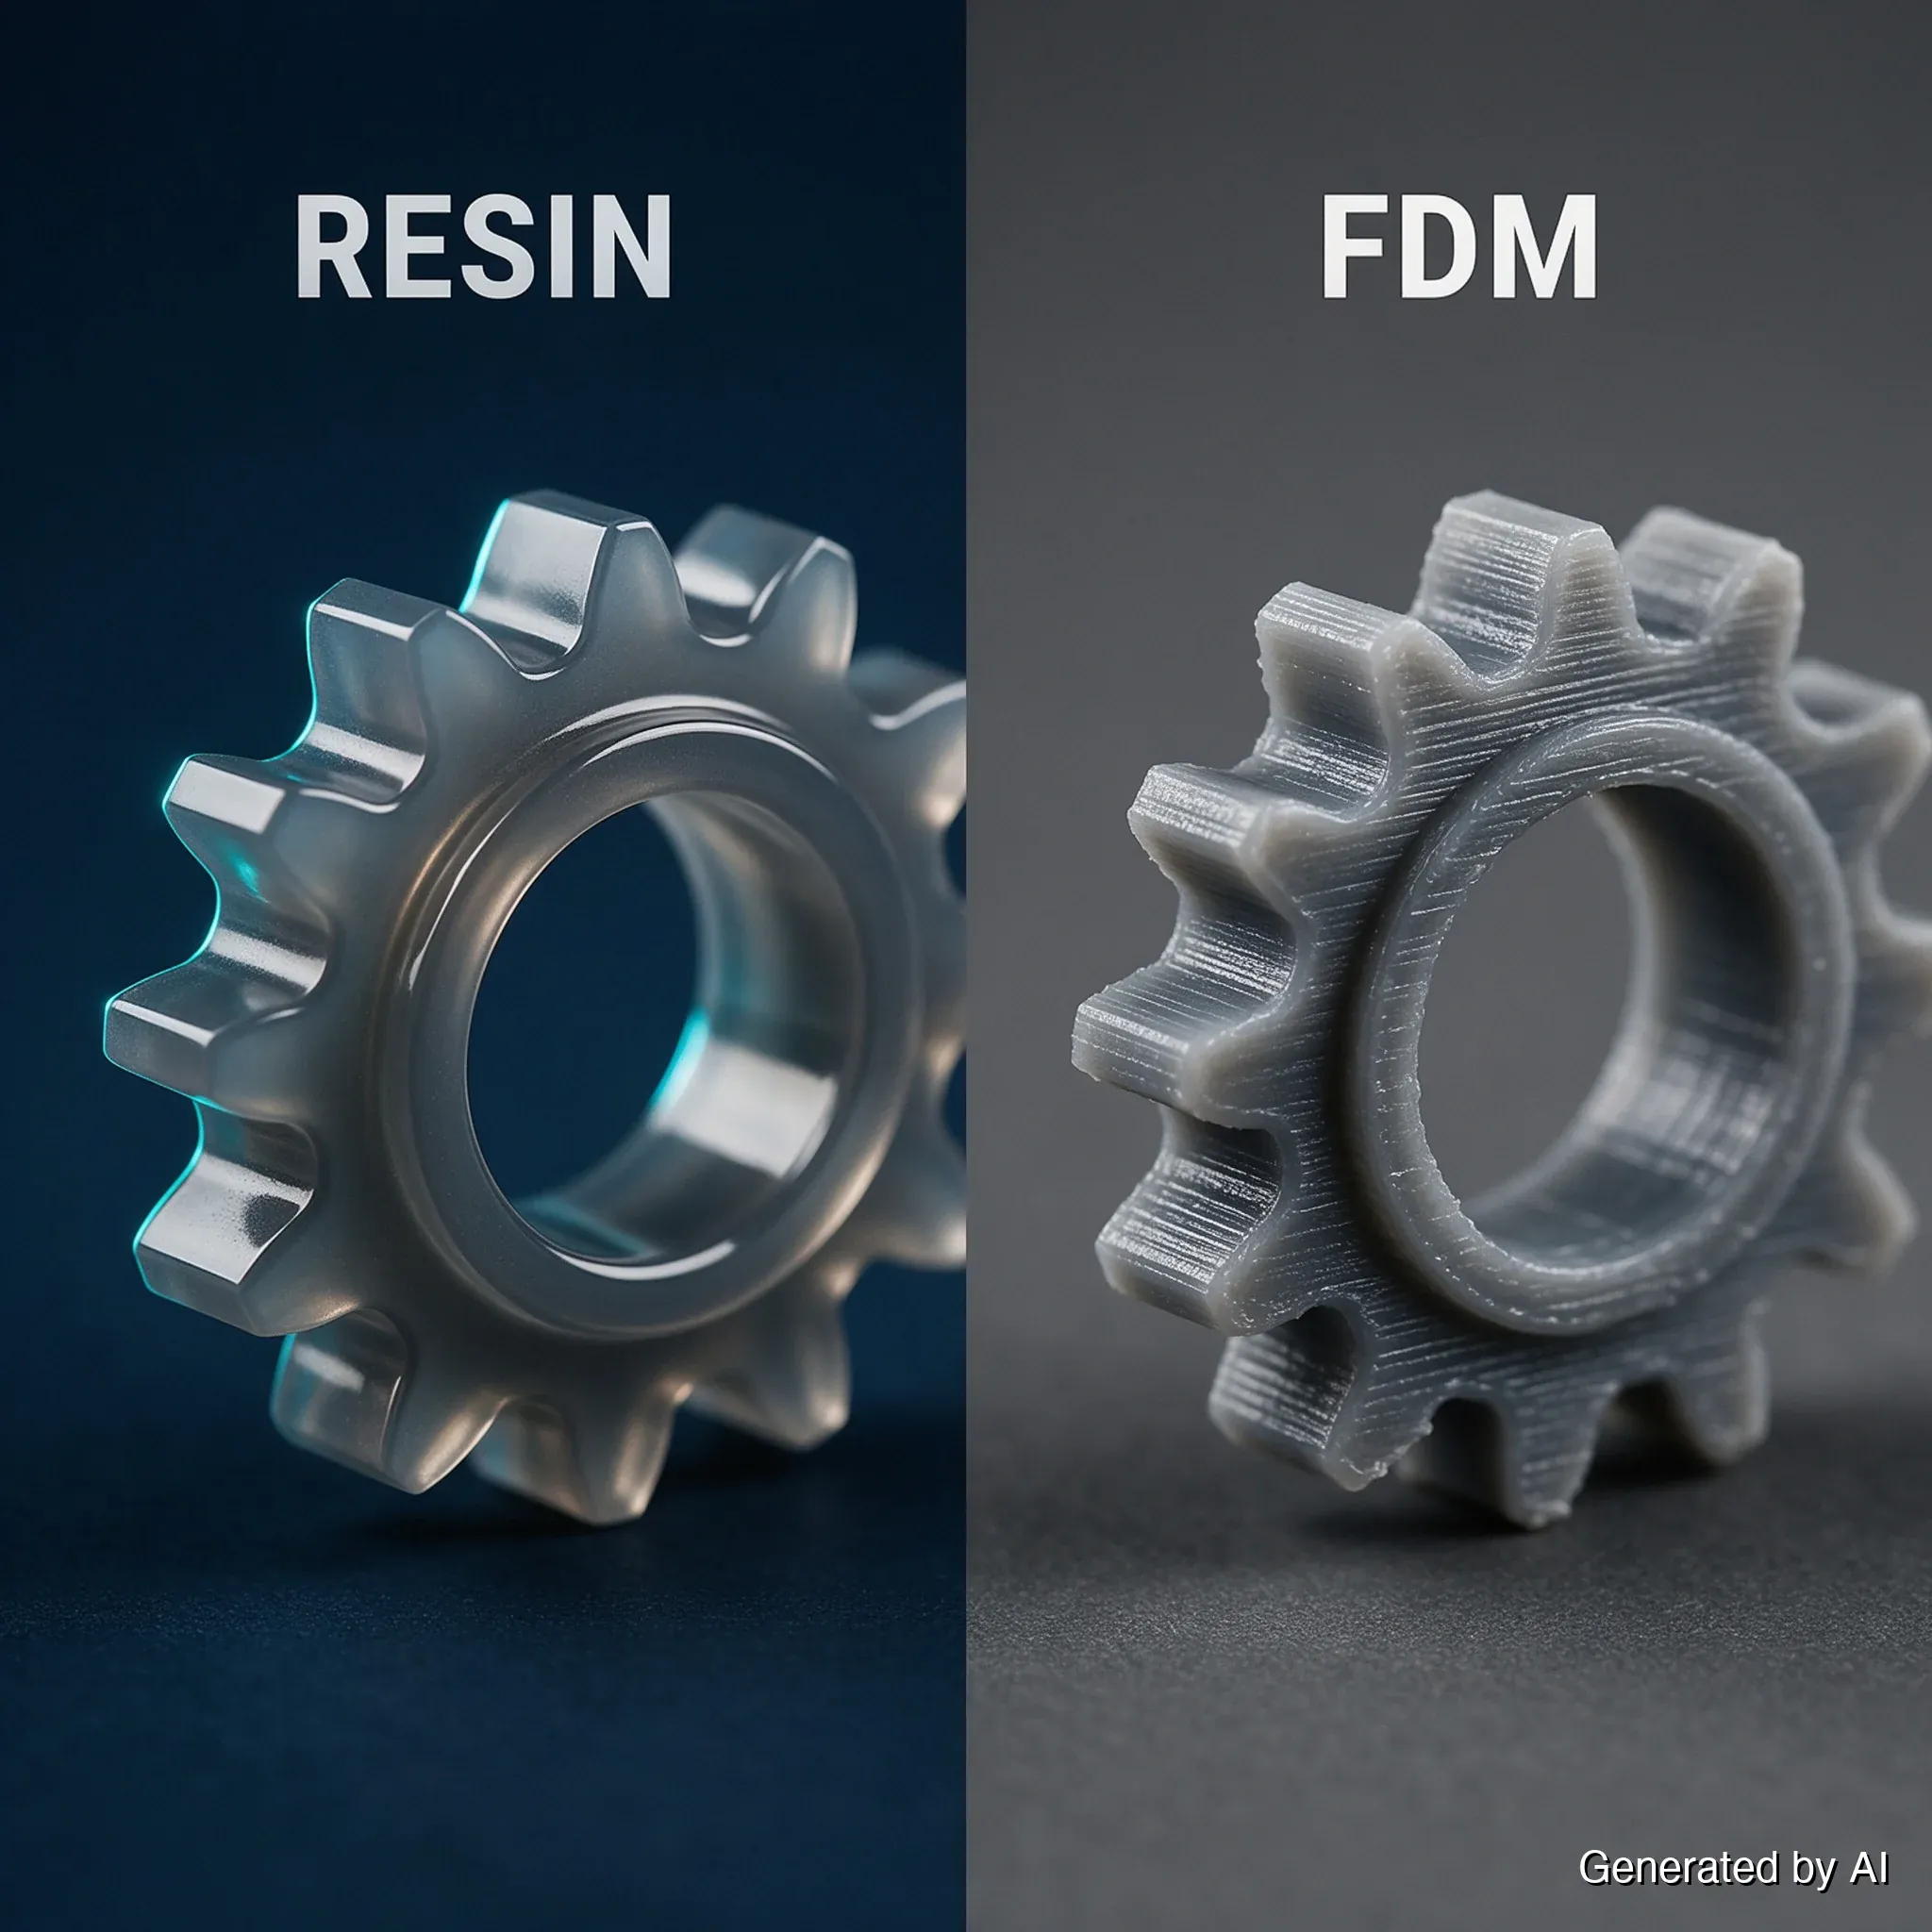
The practical read: if the part's value lives in its surface and detail, resin is the stronger starting point. If its value lives in size, strength, or weathering, FDM is. Plenty of projects use both, sending the visible detail parts to resin and the brackets, housings, and jigs to filament. The full decision framework, including cost curves and surface comparisons, sits in the SLA vs FDM breakdown.
One more route exists for parts that need resin-level detail without the resin workflow at home. The home version of that workflow runs print, wash, cure, clean, and dispose — ventilation, gloves, solvent, wash-and-cure stations, and waste handling are a real overhead, and a part that needs exactly one print does not need a bench built for a hundred. The outsourced version compresses the same job into upload, automatic manufacturability checks, engineer review, printing, and post-processing: JLC3DP's SLA printing service takes the model from there and ships a finished, cured part. For occasional or one-off parts, that removes the need to invest in a printer, washing equipment, ventilation, and a post-processing workflow altogether.
FAQ about How Do Resin Printers Work? Resin 3D Printing Explained
Q: How do resin 3D printers work?
A resin 3D printer cures liquid photopolymer with light, layer by layer. An SLA machine traces each layer with a laser; DLP and MSLA machines expose the whole layer at once as a projected or masked image. The build plate sits in a vat of resin with a transparent film at the bottom, and the light source below cures each cross-section against the plate. The plate lifts to peel the cured layer off the film, fresh resin flows back underneath, and the cycle repeats until the part is complete.
Q: What is a resin printer used for?
Small parts where surface finish and fine detail matter: miniatures and display models, jewelry patterns and castable parts, dental models and surgical guides, and small precision components with features too fine for a nozzle. Resin is also the usual choice when a smooth surface matters more than strength.
Q: Are resin printers hard to use?
The machine is not the hard part. Slicing, supports, and printing follow the same logic as any other printer, and a first print from a default profile is a reasonable bet. The learning curve sits in the routine around it: handling liquid resin safely, dialing in exposure, and washing and post-curing every part properly. Nothing there is complicated, but none of it is optional.
Q: Do resin prints need post-curing?
Yes. A washed part has not finished reacting, and post-curing is what helps it reach the mechanical properties the resin manufacturer specifies. Without it, parts stay softer than the datasheet describes, and residual surface resin stays reactive. Post-curing also brings residual surface resin toward full conversion, which is what typically allows the finished part to be handled without gloves.
Q: How long does a resin print take?
A 50mm-tall part printed at 0.05mm layer height requires about 1,000 layers. Actual print time depends on exposure time, lift and retract speeds, wait times, and other printer settings — exposure is only one part of each layer cycle — plus post-processing afterwards. Detail settings are the main lever on duration: halving layer height roughly doubles the layer count, while the horizontal detail is fixed by the machine's pixel or laser spot size.
Q: Is resin 3D printing safe at home?
It can be, with the right routine. Uncured resin is a skin sensitizer and irritant, so nitrile gloves, ventilation, and eye protection are part of the setup rather than optional extras, and liquid waste needs curing or proper disposal instead of going down a drain. The finished part is far less of a concern than the liquid: once washed and post-cured, a standard resin part can typically be handled without gloves, though the exact safety profile depends on the resin formulation and the manufacturer's safety data sheet.
Q: Can I get resin parts printed without owning a printer?
Yes, and for occasional work it is the better route. JLC3DP prints resin parts via SLA across a range of engineering materials, with automatic manufacturability checks on upload and an engineer reviewing the model before it runs. You get a finished, cured part without the ventilation, solvent, and waste handling — upload your model for an instant quote.
From Vat to Finished Part
A resin printer does something no filament machine does: it grows a part out of liquid, layer by layer, and peels each slice off a film on the way up. That mechanic explains the rest — why parts get tilted, why supports are dense, why layer height and pixel size govern two different kinds of detail, and why a print is not finished when it comes off the plate. Handle the liquid with gloves and ventilation, wash and post-cure the part, and match the process to the geometry: resin where the detail lives, FDM where the strength and size do.
When a part needs that resin-level finish and you would rather skip the bench, workflow, and waste, JLC3DP prints it in resin and ships it cured.
Keep Learning
How Do Resin 3D Printers Work? A Beginner's Guide
Key Takeaways A resin 3D printer works by curing each layer of liquid photopolymer with light — either tracing the layer with a laser or exposing it through a projected or masked image. A build plate dips into a shallow vat of resin, and the layer hardens only where light reaches it. The print cycle runs on a rhythm fused deposition modeling (FDM) machines do not have: expose the layer, peel it off the film at the bottom of the vat, let fresh resin flow back, and repeat. A 50mm part at 0.05mm layers t......
DLP 3D Printing: How It Works, Resolution & Accuracy
Key Takeaways DLP 3D printing is a resin process that cures an entire layer in one flash of a digital projector, using a chip of microscopic mirrors to project each slice as a single image. The technology comes from digital light processing projectors: a Digital Micromirror Device (DMD), developed at Texas Instruments in 1987, steers thousands of tiny mirrors to draw the layer with light. Because the whole layer flashes at once, layer time stays constant no matter how many parts sit on the build plate......
SLA vs DLP 3D Printing: The Ultimate Guide to Speed, Accuracy, and Choosing the Right Technology
SLA vs DLP 3D Printing: What’s the Difference? When discussing modern resin 3D printing, SLA (stereolithography) and DLP (digital light processing) are two technologies that are hard to ignore in both the history and evolution of resin printing. As two of the most widely used resin printing methods today, both processes use liquid photopolymer resin and UV light to build highly detailed parts layer by layer. However, they differ significantly in how each layer is cured, which directly affects print sp......
What's the Difference Between Desktop and Industrial SLA 3D Printers?
In the world of 3D printing,Stereolithography (SLA) has gained prominence for its precision and versatility. SLA technology, which uses a UV laser to solidify liquid resin layer by layer, has given rise to both desktop and industrial SLA 3D printers. Understanding the distinctions between these two categories is crucial for making informed decisions about which one suits your needs. Let's delve into the nuances of desktop and industrial SLA 3D printers. Comparison: Desktop vs. Industrial SLA 3D Printe......