How to Turn a Photo Into a 3D Model: AI, Photogrammetry & 3D Scanning
11 min
- Quick Overview
- How to Turn a Photo Into a 3D Model (Step-by-Step Workflow)
- Single Photo vs Multiple Photos: Which Should You Use?
- AI Generation vs Photogrammetry vs 3D Scanning
- How Accurate Are AI Photo-to-3D Models?
- Common Photo-to-3D Problems and Quick Fixes
- Pro Tips for Better 3D Photo Conversions
- What Tools Can Turn a Photo Into a 3D Model?
- FAQ about Photo to 3D Model Conversion
Quick Overview
You can convert a regular photo into a usable 3D model using AI image generation, multi-photo reconstruction, photogrammetry, or 3D scanning.
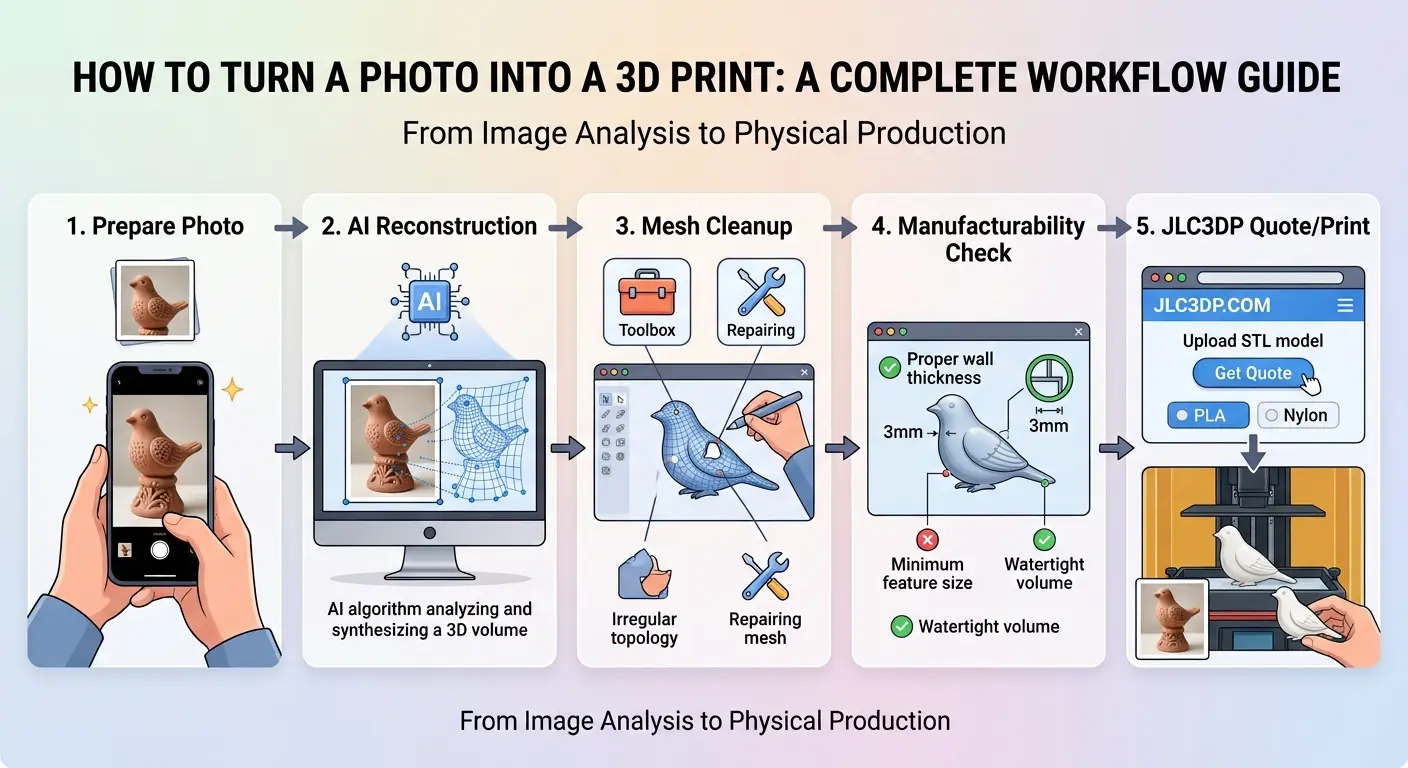
For most creators and beginners, the simplest workflow is straightforward: prepare your photo, generate a 3D model, inspect every angle, fix geometry issues, and export.
Single-image AI tools work best for fast visual results. If you need precise shapes, complete object coverage, or accurate real-world dimensions, multi-photo reconstruction, photogrammetry, or physical 3D scanning will deliver far better quality.
How to Turn a Photo Into a 3D Model (Step-by-Step Workflow)
Step 1: Select and Prepare Your Reference Photo
You don't need professional camera gear to create a 3D model from a photo, but clean input drastically reduces fixing time later. Blurry, cluttered, or heavily shadowed photos almost always produce broken models.
Before uploading your image, make sure:
- The main subject is sharp and fully in focus
- Key features, edges, and details are visible
- The object occupies most of the frame (crop out empty or chaotic background)
- No major parts are blocked or obscured
- Lighting is even -- harsh shadows hide geometry and cause reconstruction errors
Pro Tip
A three-quarter angle consistently outperforms flat front-facing photos. Front shots show surface detail but contain almost no depth information. A slight angled view gives the AI or reconstruction software clear front, side, and depth cues for more accurate proportions.
Single photos work fine for simple decorative models. If your project requires clean backsides, accurate side profiles, or complex geometry, capture multiple angles (front, back, left, right, and diagonal views) for better results.
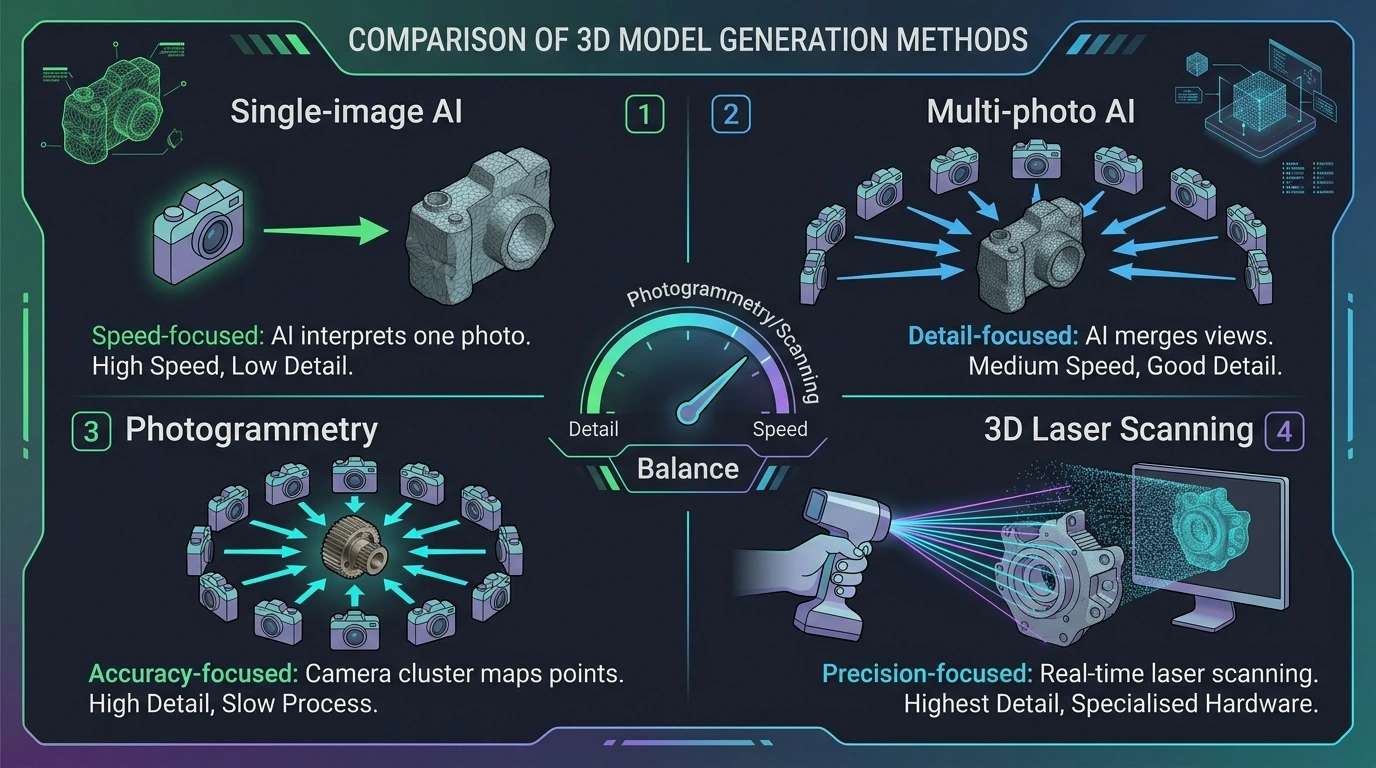
Step 2: Choose Your 3D Generation Method
Each method serves a different purpose -- speed, visual quality, or dimensional accuracy. Pick based on what you plan to do with the final model.
1.Single-Image AI 3D Generation (Best for Fast Visual Assets)
This is the fastest method if you only have one or two reference photos. It is particularly useful for characters, figurines, toys, sculptures, and other visually driven models.
The process is simple: upload your photo, run image-to-3D generation, inspect the preview, and download your mesh.
The main downside: AI guesses all hidden geometry. Back sides, inner structures, and obscured details are estimated, not captured. This is perfect for renders and visual previews, but unreliable for precise mechanical parts or 3D prints that need exact fit.
2.Multi-Photo AI Reconstruction (Better Completeness)
If your tool supports multiple images, upload a consistent set of angles of the same object. Multiple references greatly improve side geometry, hidden surfaces, and overall proportion accuracy.
Keep lighting, distance, and object positioning consistent across all photos to avoid confusing the reconstruction algorithm.
3.Photogrammetry (Best for Real-World Object Reconstruction)
Photogrammetry turns dozens of overlapping photos of a real object into a detailed mesh. This method produces far more realistic surface detail than single-image AI and is ideal for real products, organic shapes, and custom physical objects.
To get clean results: keep the object stationary, shoot evenly lit overlapping frames, and avoid blurry or overexposed shots.
4.3D Scanning (Best for Dimensional Accuracy)
3D scanning captures measured surface geometry rather than inferring hidden shapes from a single image. However, the resulting mesh may still require alignment, cleanup, dimensional verification, or reverse engineering before it can be used for precision applications.
| Method | What It Does | Geometry Accuracy | Best For |
|---|---|---|---|
| Single-image AI | Generates unseen geometry | Low–Medium | Concepts | Multi-view AI | Reconstructs from multiple views | Medium | Detailed assets |
| Photogrammetry | Reconstructs real surfaces | High | Object capture |
| 3D scanning | Captures measured geometry | Highest | Functional parts |
Step 3: Inspect the Model From Every Angle
Never download your model immediately after generation. AI models often look perfect from the original photo angle but break completely when rotated.
Check every view -- front, back, sides, top, and bottom -- and look for common issues:
- Missing geometry or broken surfaces
- Distorted proportions or stretched features
- Floating mesh fragments and random extra geometry
- Over-smoothed or erased small details
- Incomplete backside reconstruction
Minor errors can be fixed in mesh editing software. If core shapes are distorted, re-generate with additional reference photos instead of wasting time fixing flawed geometry.
Step 4: Clean Up the Mesh for Production Use
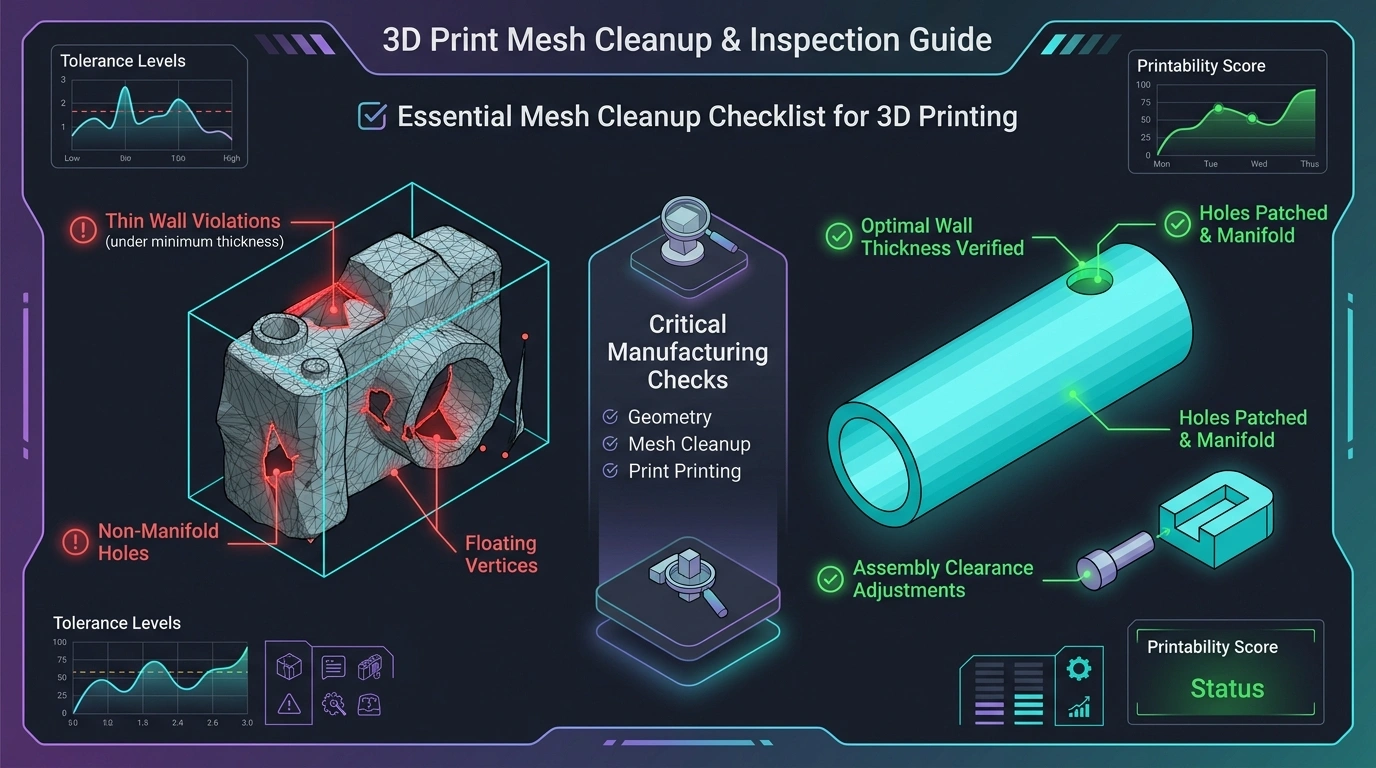
Nearly all AI-generated models require basic cleanup before rendering, animating, or 3D printing. A mesh that looks correct in a viewer may still fail manufacturing checks because visual completeness does not guarantee sufficient wall thickness, closed geometry, minimum feature size, or printable clearance.
Focus on these key fixes:
- Remove floating geometry: Delete stray mesh pieces that are not part of the actual object.
- Fill holes and gaps: Patch incomplete surfaces to make the model watertight.
- Correct distorted details: Fix thin features like cables, handles, fingers, and small decorative elements that AI often warps.
- Simplify dense meshes: High-poly generated files slow down editing and rendering. Simplify or remesh the model for cleaner topology when needed.
Step 5: Calibrate Real-World Scale
AI-generated meshes generally do not contain reliable real-world dimensional information unless the generation workflow explicitly uses known scale or reference measurements. A model that looks visually correct might import at random, incorrect dimensions.
If you plan to 3D print, assemble parts, or use the model for engineering work, scale it using one known real measurement (height, width, or length) to lock accurate units.
Visual-only renders can skip strict scaling, but functional projects always require precise dimension checking.
Step 6: Prepare the Model for 3D Printing or Manufacturing
For manufacturing, visual accuracy and dimensional accuracy are two different requirements. A model can look convincing on screen while still being unsuitable for assembly or production. Before exporting your final file, complete these critical manufacturing checks:
1.Verify Minimum Wall Thickness
Different 3D printing technologies have distinct minimum wall thickness requirements. Thin walls commonly cause warping, breakage, or incomplete printing. Always match your model's wall thickness to your printing process standards -- for reference, common industrial manufacturing standards recommend a minimum wall thickness of 1.2mm for resin printing and 2.0mm for FDM printing for stable structural performance.
2.Check Minimum Feature Size
AI-generated models often include overly fine details that cannot be physically produced. Inspect small critical features including positioning pins, snap hooks, tiny connectors, embossed logos, and engraved textures. Remove or thicken undersized features that fall below standard manufacturing minimums to ensure successful production.
3.Confirm Assembly Clearance
If your model involves moving parts, snap-fit connections, articulated structures, or multi-part assembly, reserved clearance is essential. Zero clearance designs will result in tight assembly or stuck moving components. Adjust gaps according to your material and printing precision to guarantee smooth assembly and movement.
4.Fix Holes and Internal Geometry
Single-image AI frequently generates fake holes, partially closed openings, blocked cavities, and non-functional internal structures. Inspect all internal geometry thoroughly, seal invalid gaps, and repair incomplete holes to form a watertight, production-qualified mesh.
5.Optimize Print Orientation
AI generation only prioritizes visual appearance, while 3D printing requires printability optimization. Adjust the model orientation to minimize overhangs, reduce support structure contact on critical surfaces, and ensure key dimensional features align with stable printing directions, which greatly improves surface quality and dimensional accuracy.
Design Note: To prevent wall collapse or printed part failure, check out our comprehensive guide on How to Design 3D Models for Printing.
Single Photo vs Multiple Photos: Which Should You Use?
Which Photo-to-3D Method Should You Use?
| Your Goal | Recommended Method |
|---|---|
| Fast visual concept model | Single-image AI |
| Complete, detailed object geometry | Multi-photo AI reconstruction |
| Accurate real-world object reconstruction | Photogrammetry |
| Precision functional/mechanical parts | 3D scanning |
| Production/manufacturing-ready models | 3D reconstruction + professional engineering cleanup |
Use a single photo for fast concepts, decorative models, character previews, and projects where visual similarity is more important than perfect accuracy.
Use multiple photos for complex shapes, detailed back/side surfaces, editable assets, and any model you plan to refine later.
AI Generation vs Photogrammetry vs 3D Scanning
Each method fits a different workflow:
- Single-image AI: Fastest for quick concepts, characters, and decorative assets
- Multi-image AI: More reliable shape coverage with fewer guessed surfaces
- Photogrammetry: Best for detailed reconstruction of real physical objects
- 3D scanning: Can provide more reliable geometric and dimensional data for functional or mechanical applications, especially when the scanner and workflow are properly calibrated and verified
How Accurate Are AI Photo-to-3D Models?
AI models excel at visual accuracy -- they look very close to the original photo. However, they lack reliable dimensional accuracy.
Proportions, hidden structures, hole sizes, and assembly features are almost always estimated. For art, renders, and casual use, this is fine. For manufacturing, fitting parts, or engineering design, always verify key measurements manually or use scanned data.
Common Photo-to-3D Problems and Quick Fixes
- Broken backside geometry: The most common single-image AI issue. Fix by adding rear-angle reference photos or manually retopologizing the back mesh.
- Wrong proportions: Photo perspective distortion warps shapes. Correct with multi-angle references and manual scaling.
- Lost small details: AI frequently simplifies text, thin edges, and tiny features. Recreate critical details manually.
- Mesh holes and broken geometry: Clean and repair meshes for printable or production-ready assets.
- Hard-to-edit messy topology: Simplify or retopologize dense, irregular AI meshes for smoother editing.
Pro Tips for Better 3D Photo Conversions
- Always use the original high-resolution image -- avoid compressed screenshots
- Crop backgrounds to let the AI focus entirely on your object
- Capture extra angles for any critical hidden surfaces
- Use a real-world measurement to set accurate scale
- Treat your first generate as a draft -- iterate with better references for clean final results
What Tools Can Turn a Photo Into a 3D Model?
Different photo-to-3D workflows rely on tailored tool types, matched to your project goals from fast concept generation to precision manufacturing.
| Workflow Method | Suitable Tool Type |
|---|---|
| Single photo quick generation | AI image-to-3D generator |
| Multi-angle object reconstruction | Multi-view AI reconstruction tool |
| Real object surface restoration | Professional photogrammetry software |
| Precision functional part production | High-precision 3D scanner |
Related Reading: CAD to 3D Print: How to Go from Design to Finished Part.
Best Export File Formats
- STL / 3MF: Standard for 3D printing
- OBJ: Ideal for geometry and texture editing
- GLB / GLTF: Perfect for web visualization, AR, and VR
- FBX: Best for animation and game engine assets
Related Reading: Understanding the Key 3D Printing File Formats.
FAQ about Photo to 3D Model Conversion
Q: Can you turn a single photo into a 3D model?
Yes. Modern AI tools generate complete 3D meshes from one single image. Just note that all unseen geometry is AI-estimated, so always inspect the full model before use.
Q: Are AI-generated 3D models usable for 3D printing?
They can be printable, but require cleanup. Fix mesh holes, check wall thickness, verify scale, and remove broken geometry before printing.
Q: Can photo-based models be used for mechanical parts?
Photos work great for visual references, but not for precise engineering. Always confirm critical dimensions manually for functional mechanical components.
Conclusion: Turning a Photo Into a 3D Model
Turning a photo into a clean 3D model is fast and accessible today with AI tools. Use single-image generation for quick visual concepts, and rely on multi-photo reconstruction, photogrammetry, or scanning whenever you need accuracy and completeness. With appropriate inspection and mesh cleanup, photo-converted models can be suitable for rendering, animation, game assets, and, after additional manufacturing checks, 3D printing.
Keep Learning
Dual Extruder 3D Printer: Types, Principles and Tips
In the 3D printing industry, with the development of dual-extrusion technology, engineers can now use dual extruder 3d printers to print parts composed of two or more materials. Compared with traditional single-extrusion printers, dual extruder 3d printers have significant advantages in functionality and application range, but at the same time, design difficulty and maintenance costs also increase. This article introduces the types, working principles, advantages and disadvantages, and printing techni......
Low Volume Manufacturing with 3D Printing: Benefits and Applications
Key Takeaways Cost-Effective Production: 3D printing eliminates expensive tooling costs, making low volume manufacturing economically viable. Faster Time-to-Market: Production can begin within days instead of weeks. Design Flexibility: Complex geometries and customization are achievable without additional tooling costs. Low volume manufacturing bridges the gap between prototyping and mass production. It is useful when companies need smaller production runs, want to test a product before investing in t......
How to Turn a Photo Into a 3D Model: AI, Photogrammetry & 3D Scanning
Quick Overview You can convert a regular photo into a usable 3D model using AI image generation, multi-photo reconstruction, photogrammetry, or 3D scanning. For most creators and beginners, the simplest workflow is straightforward: prepare your photo, generate a 3D model, inspect every angle, fix geometry issues, and export. Single-image AI tools work best for fast visual results. If you need precise shapes, complete object coverage, or accurate real-world dimensions, multi-photo reconstruction, photo......
Tree Support vs Grid Support in 3D Printing: How to Choose the Right Support Strategy
Key Takeaways -A 45° overhang is a conservative starting point for support decisions, not a universal rule. -Tree or organic supports use branching geometry to reach overhangs with less unnecessary contact. -Grid-style supports generally provide broader, more continuous support beneath large areas. -Material savings and print-time differences vary by model, orientation, slicer, interface settings, and support density. -The best support settings should be treated as starting points and adjusted accordi......
How Accurate is FDM 3D Printing for Prototyping?
When speed and affordability matter, FDM 3D printing often takes center stage in prototyping. But there's one question that comes up time and again, how accurate is FDM 3D printing really? If you're developing a functional prototype, testing fitment, or evaluating mechanical properties, understanding the accuracy of 3D printing, especially FDM, can be the difference between a reliable test piece and a misleading mockup. (souruce: Unsplash) What is FDM 3D Printing? FDM (Fused Deposition Modeling) is a ......
Exploring the Potential of FDM for Flexible 3D Printing
What is flexible 3D printing? The term "flexible 3D printing" describes the technique of producing three-dimensional goods with materials that have elasticity and may compress, bend, or stretch. FDM 3D Printing Flexible FDM 3D printing makes use of Fused Deposition Modelling (FDM) to create three-dimensional things out of flexible and elastic materials. varying degrees of flexibility and durability can be produced by adapting FDM printers to accept flexible filaments such as thermoplastic elastomers (......